2 exercises to strengthen the rider's vision in show jumping with horses
When riding on a connected broken line, you must pass through two obstacles that are arranged on a curve and at related distances; where your riding style on the first obstacle directly affects your approach to the second obstacle.
For a successful and smooth execution, you must keep the horse balanced while selecting the correct path and rhythm to achieve the desired number of strides between the two obstacles.
Any loss of balance, direction, or rhythm makes it difficult to recover between the obstacles and causes you to lose "distance," resulting in either one stride too few or too many, or a jump from a point that is either too close or too far.
Combining two broken lines and creating a set of three or more obstacles that are connected by related distances increases this challenge.
If this type of line is ridden well, each obstacle prepares you for the next one.
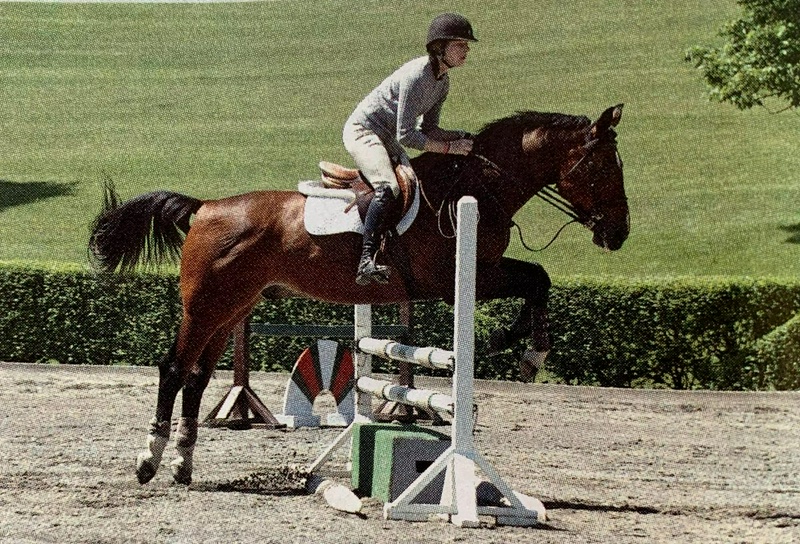
The calm demeanor of Karen Foley and her 10-year-old Dutch Warmblood horse, Safari, shows that Karen's careful planning and excellent focus on each obstacle have helped this pair navigate the three-obstacle line with an S-shaped curve effortlessly.
When you ride the connected distances well, each obstacle sets the stage for the next one.
For each obstacle, you must separate from the ground with control and land with control.
Especially at the first obstacle of the line, you must act responsibly regarding your path both when approaching the obstacle and when moving away from it.
In this article, I will introduce two exercises that I use with many of my students to help strengthen these fundamental skills and "adjust" your vision.
The first exercise combines two lines that curve in one direction to create a semicircle.
With this exercise, you can practice your timing skills without worrying about changing hands.
Once you master it, you will be ready for the second exercise; that is, two soft loops in an S-shaped line that includes changing bend and changing hands in the middle of the two broken lines.
In these exercises, you use your inside and outside aids of the reins and legs to guide your "whole horse" through the turns; you add a stride or take one away to better feel the type of rhythm needed for smooth and forward lines; you focus your eyes on the new destination before and after the jumps to improve your guidance, patience until reaching the obstacles, and calmness throughout the course.
Proper use of the eyes connects the jumps in broken lines and maximizes your ability to ride them correctly; and you coordinate your aids to ask the correct hand from the horse during landing.
Both exercises provide you with plenty of opportunities for change and adjustment; therefore, you can work creatively with just three or four obstacles and keep your training sessions engaging.
An added benefit of these exercises is that their rotational and gymnastic nature improves the horse's jumping style and makes him more balanced, adjustable, and responsive between obstacles.
I use these exercises for all horses and riders in equestrian and show jumping, from 2 feet 6 inches to 4 feet and above.
If you can use your hands, legs, and seat independently of one another, stay on the designated path without noticeable deviation to the right or left, and know how to adjust the horse's stride length for different distances, you are ready to perform these exercises.
You should feel comfortable riding on lines spaced at a standard distance of 12 feet for each stride, as well as slightly shorter or longer distances.
Before attempting connected broken lines, make sure you have sufficient mastery in riding connected straight lines; that is, three or more obstacles that are connected in a straight line with related strides.
Exercise 1: Three vertical obstacles on a semicircle. In this exercise, you will learn how to approach two broken lines with the correct balance and rhythm; whether for more compact distances or for forward distances.
Since you will remain on the same lead throughout the exercise, you can focus on maintaining the outside rein aid so that your horse stays on the circular path.
Setup: Place three vertical obstacles on a large circle.
Visualize a clock face in your mind and place the obstacles at the 12 o'clock, 3 o'clock, and 6 o'clock positions.
Consider the distance from each obstacle to the next as 60 feet; that is, the standard distance of four strides measured on curved lines from the center of one obstacle to the center of the next.
Make sure there is enough space to approach and exit all obstacles from both directions.
See the diagram below.
Place ground poles on both sides of each obstacle.
Set the cups of the obstacles on the inner standards 3 inches higher than the usual jumping height, and then place the cups of the outer standards 6 inches lower than usual.
This helps prevent your horse from taking the path inward when approaching the obstacle.
Start by jumping the first two obstacles of the exercise.
Once you are comfortable with this part, you can add the third obstacle.
Five uniform strides for the first part of this exercise, take each line with five uniform strides.
Although the line is set for four strides, fitting in five strides is easier than you think.
Your horse will initially not know where to go and will therefore be more inclined to collect its stride and stay on the path you choose.
Start the work with just the first two obstacles.
First, visualize an imaginary curved line that passes through the center of each of the obstacles and creates a quarter of a circle.
This is your path.
Take a balanced and continuous canter, on whichever lead your horse jumps and turns better, while keeping its strides controlled and relatively short.
For example, if you are on the right lead, the first obstacle will be positioned at 12 o'clock.
In the approach to the first obstacle and also in the distance between obstacles, keep your upper body stretched and close to vertical to help maintain the horse's balance for shorter strides.
Try to approach each obstacle exactly from the center and perpendicularly so that your horse lands in the correct direction towards the next obstacle.
Pass by the outer standard of the third obstacle; the same obstacle you are not going to jump over for now, which is positioned at 6 o'clock.
Then enter the curved semicircular path where there is no obstacle.
Throughout the exercise, use your eyes and always focus on the next destination; the next obstacle, pole, or any other target point.
As you pass the 9 o'clock position, look at the center of obstacle 1.
Be patient when approaching the obstacle, stay on the curved line, and help your horse to take off from the ground with balance and from a deeper jumping point.
This will make his hooves land on the other side of the obstacle, closer to the obstacle itself, giving you more space to fit in 5 strides.
If the horse jumps from a further distance, it will be difficult to influence his landing spot and control his balance and line of movement towards the next obstacle.
As you approach the jumping point, look at obstacle 2.
When passing over the first obstacle, with a subtle indirect inside rein, show the horse the turn ahead.
For example, if you are going to turn right, bring your right hand towards the left hip so that the right rein touches the side of the horse's neck.
Close the inside leg at the tight spot so that the horse does not drift inward.
Maintain contact with the outside leg and rein so that the horse does not drift outward from the line of movement.
As soon as you land from obstacle 1, keep your focus on obstacle 2 and continue moving in a quarter-circle path.
Between the obstacles, keep your upper body stretched and upright, and guide the whole body of the horse through the turn with both reins and both legs; do not just pull the inside rein.
You will notice that to prevent the horse from drifting off the path, the aids of the outside rein and leg are even more important than when you are moving in a straight line.
At the jumping point of obstacle 2, focus on the straight line ahead and be ready to either collect the horse on a straight line afterward or pass by obstacle 3 and repeat the exercise.
When you feel comfortable with the two obstacles, add the third obstacle as well.
This time, imagine an imaginary curved line that passes through the center of all three obstacles and returns from the last obstacle to the first, creating a perfectly round circle.
This is your line of movement.
Enter the exercise with the same regular canter so that it fits 5 strides in each line.
Again, as soon as you find your distance to the previous obstacle, focus your gaze on the next obstacle.
If your horse has difficulty fitting in 5 strides even with a very gentle entry into the exercise, choose a slightly wider line between the obstacles.
By developing your ability to maintain control over both the line of movement and the length of the horse's stride, you will learn to successfully navigate any broken line.
When your horse jumps well in this exercise on the correct lead, perform the same exercise in the other direction as well.
Start again with just the first two obstacles until the horse is ready to add the third obstacle.
Remember to always stay focused on your line of movement both when approaching each obstacle and when landing afterward.
Any deviation from this line will alter your pacing to the next obstacle.
If at any point between the obstacles, your horse lands on the wrong lead, do not let your focus be disrupted.
Changing the take-off lead in the middle of a broken line can disrupt the process and cause you to lose the distance to the next obstacle.
Instead, regardless of what the horse is doing with the lead—whether maintaining the counter canter, going cross-canter, etc.—focus on executing the exercise.
Let the horse understand the exercise on its own.
After a few repetitions, he will land on the correct lead and maintain it, as this position will be more balanced for him.
When you can comfortably execute the five-stride lines in both directions, lengthen your horse's stride in the approach to reach the usual working canter rhythm of the competition arena, and then jump the lines this time with four smoother and more forward strides.
This time, with a more forward upper body position, ride a little closer to the line you took in the five-stride exercise.
To make the turn towards obstacle 3 easier, take the turn from obstacle 1 to 2 a bit wider to reach the center of obstacle 2, while having a very slight angle towards the inside of the circle.
Note: I do not recommend regularly performing the "Chaharnal" for jumping horses, as it encourages them to jump a bit flatter than you would want in the competition arena.
To increase the difficulty for a more challenging exercise, use oxers instead of verticals.
Place the inner poles of the oxers close enough together to touch and set the outer poles further apart; approximately the width you would normally jump at the desired height.
This setup encourages your horse to engage its body better over the obstacle, resulting in improved technique and arc in its jump.
Set the cups on the inner poles higher than those on the outer poles.
This will cause your horse to hit less towards the inside when taking off for the jump.
The result of this combination will be a more direct, sharper, and rounder effort in the jump.
If you have trouble executing this exercise, see the "Troubleshooting" section below.
Exercise 2: Three verticals on a serpentine course The next exercise builds on the skills you learned in Exercise 1 and helps improve your horse's flexibility and your guiding aids by adding a bend in the middle of the course.
Layout: Set three verticals on a two-loop serpentine (according to the diagram below), ensuring the distances on the curved lines between the center of each obstacle to the next are five and a half strides, or 78 feet.
Set the obstacles at the same height you would normally jump and place ground lines on both sides of them.
As mentioned in Exercise 1, ensure there is enough space to approach and exit all obstacles from both directions.
Like the five-stride version of Exercise 1, start with the same balanced, compact, and organized canter; keep your upper body elongated and close to a vertical position.
Approach obstacle 1 with a right lead, but this time on a straight line.
Be patient and allow your horse to find the right take-off point with enough depth to land in the same compact and balanced canter.
Using both legs and reins simultaneously, gently guide him to the right in the air while keeping your eyes on obstacle 2.
With both reins and legs, guide your horse's entire body through the turn and ask him to fit six equal strides in this line.
If in the half-circle exercise it was difficult for him to fit five strides, here again widen your lines' arc so he can fit these six strides more easily.
When jumping over obstacle 2, look straight down the diagonal path ahead.
After passing obstacle 3, continue the canter for a suitable distance and then look back over your left shoulder to make the return turn towards it.
If he lands incorrectly with the lead, perform a flying change before the turn.
Maintain the same steady and balanced canter to prepare for a calm jumping point for the next six strides in the broken line to obstacle 2.
Turn your gaze towards it as soon as possible to encourage it to land on the right lead.
Ride these six even strides just like the first broken line.
If it does not land on the right lead, do not attempt to change the flying lead in the middle of the line.
Let it realize that landing on the correct lead is easier for it.
At obstacle 2, refocus your gaze on the diagonal line so that you can go straight into the canter after landing and then gradually transition to a halt or walk.
Repeat this "adding" exercise several times, then bring the rhythm to the appropriate speed for the competition as you approach the obstacles, and ask for five strides forward at every distance.
Just as you did in the "Hunter Four" stride pattern in the half-circle exercise, you can ride the turns a little shallower and inside the paths you took for the six-stride lines to make reaching the forward distance easier.
When you confidently ride both the added distances and the usual distances on the upward path, connect the two broken lines and ride the course from obstacle 1 to 2 to 3, or vice versa from obstacle 3 to 2 to 1, which is ridden exactly the same way; first each in six strides and then in five strides.
Again, use your gaze to focus on the new destination and pay attention to the approach to each jump just as much as you do after the landings.
To correct any issues in jumping any of these broken line exercises, you can address the most common problems as follows: Mistake: When riding the "adding" stride pattern, you reach the first obstacle with a high jumping point.
As a result, after landing, you have less control over the stride and direction of your horse, and you are forced to hurriedly regain balance to try to reach the correct distance for the next jump in time.
Solution: Take enough time to reach the first obstacle in a regular and balanced canter and on the correct line.
Then be patient and wait for a calm and relatively deep jumping point.
This way, your horse will be balanced and compact after landing and ready to adjust the strides correctly to the next obstacle.
Mistake: Your horse drifts out of line and veers towards the outside of the broken line; as a result, you are forced to over-correct the path to return to the center of the next obstacle.
This alters the distance in the line and creates a high and/or inappropriate jumping point.
Note: Since horses usually have a "better side" and a "weaker side," this issue may occur more in one direction than the other for you.
Solution: Prepare yourself in advance for the broken lines; that is, when the horse passes over the obstacle, its body should be perpendicular to the obstacles, or even have a slight angle from outside to inside.
Be sure to keep the entire body of the horse on the chosen line with both legs and both reins.
To correct the outward drift, apply stronger outside aids than inside aids.
Mistake: Your horse is taking the path inward and approaches the next obstacle at an angle and an inappropriate distance.
Solution: Again in the turns, guide the entire body of the horse and use both reins and both legs.
In this case, apply a little more pressure from the inside leg to guide the horse outward and onto the correct line.
About Peter Leone
Peter Leone, a Grand Prix show jumping rider, began riding at the age of 5 and before winning the Grand Prix at the World Cup in New York at the age of 18, he won numerous awards as the best child rider in major horse shows.
Since then, he has represented the United States equestrian team in various international competitions, including the 1982 World Championship and the 1996 Olympics, where his teams finished fourth and won a silver medal, respectively.
Peter, who was the middle child of three brothers who rode under the name "Team Leone," honed his riding skills under the guidance of prominent figures such as Berlin Dehnemati, Frank Chapot, George Morris, and Michael Matz.
This article was first published in the October 2009 issue of Practical Horseman.
Source: Practical Horseman – Training