Solutions for improving body condition and assistance in show jumping with horses
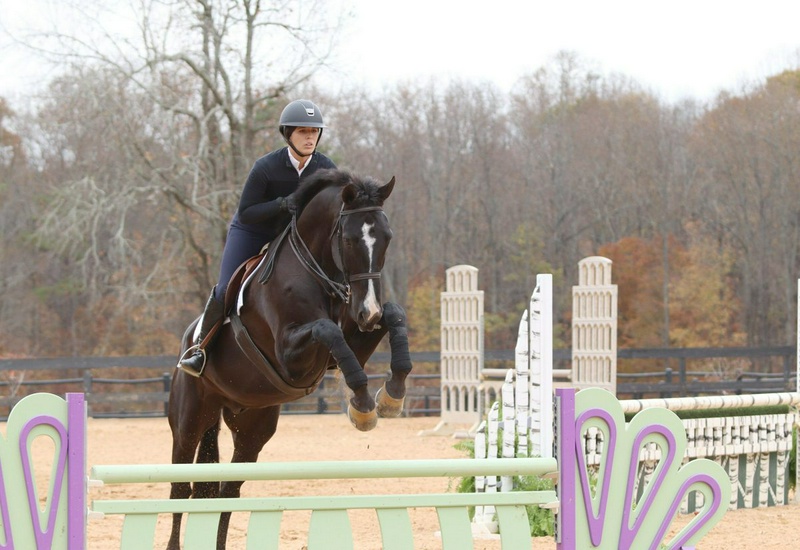
A correct and firm body position allows you to use your aids independently and effectively, influence your horse, and ride with more confidence.
However, shaping and maintaining a strong body position and coordinating the aids is one of the main challenges for many riders.
In theory, the subject seems simple, but executing it is not always easy.
Sarah Spencer, riding Pinterest, a gelding Warmblood owned by Marie Oubel, demonstrates how a correct body position enables independent and effective use of aids, resulting in more successful rounds of show jumping.
I will explain what points I look for in a rider's body position and how to use the aids to communicate with the horse.
Then, I will introduce a simple jumping exercise that helps you focus on body position and aids; an exercise that directly applies to riding on a course of obstacles.
Body Position Assessment: Dos and Don'ts A correct and balanced body position allows you to use the aids not only independently and effectively but also softly and imperceptibly.
Incoherent or excessive aids can lead to incoherent and abrupt riding or, worse, create a confused or unwilling horse.
First, we look at the base of support, or the position of the lower body, from the legs to the waist.
I consider the legs to be the foundation and the most important part of a rider's body position.
Contact between the calf, knee, and thigh should be evenly distributed.
The stirrup should be positioned at an angle under the ball of the foot, so that the inner branch of the stirrup is slightly behind the outer branch.
Heels should be down, and weight should rest on them to absorb shock and keep the legs as extended as possible; almost as if you have wrapped your legs around the horse's belly.
Some riders mistakenly lift their heels, resulting in more weight falling on the ball of the foot.
When landing after a jump, this position causes you to put pressure on the knees and the horse's neck because there is no support to maintain your balance.
Landing on the horse's neck and losing balance can be troublesome, especially when entering a line of obstacles, as it may take several steps to rise again, regain your balance, and be able to act effectively.
By that time, you may have already covered half the line, and it may be too late to make adjustments.
Next, if we look at other angles in this base of support, the angle of the knee from the thigh to the calf should be about 90 degrees, although this can vary depending on body shape.
If you have short legs, this angle may be less than that of someone with long legs.
The angle of the hip also relates to the thigh's relationship with the upper body.
If you lean forward, you close the hip angle; this raises the seat from the saddle and allows the horse to move forward more freely; similar to the position of a race rider on a racehorse.
If you lean back, you open the hip angle, and this encourages the horse to collect and reduce its pace.
If we go to the upper body, the back should be straight, the gaze should be forward, and the head should remain above the shoulders.
The visor of the helmet should also be parallel to the ground.
Wrists should be straight, and elbows should be slightly bent.
It is very important that the hands are soft and independent, and the arms are in a relaxed position so that only the elbow joints open and close.
When rising in the saddle, when you sit back down, the elbows should bend.
When you rise from the saddle, the elbows should open a little more.
In the counter, the arms remain relaxed and the hands follow the horse's movement.
The reins should be without twisting.
If you are riding the horse with a Pelham bit, hold the simple rein outside the lever rein, place your little finger between the two reins, and keep your thumb on the reins.
If you step back a bit and look at your overall sitting position, the body should be in a straight line; the lower legs should be straight and vertical under the body, and an imaginary line should pass through the shoulder, hip, and heel.
Another imaginary line should extend straight from your elbow to the horse's mouth.
Warming up flatwork in flatwork sessions before jumping, ask the horse to maintain balance, lengthen and shorten the stride, perform lateral movements, and stay straight, change the counter hand, whether simply or in a flying manner; also make sure you work evenly in both directions so that the horse remains physically balanced.
If your horse can move forward and backward, and left and right, you are on the path to having a suitable and adjustable horse for jumping.
Warming up is also a good time to gauge the horse's reaction to leg aids.
I believe every horse has its ideal rhythm and speed for jumping, and it is the rider's job to find it so that the horse is light in front of the leg and in hand.
A horse that is in front of the leg has forwardness, energy, and coverage of the ground, and for this reason, adjustments can be made more easily on it, as the horse provides a greater range for changing rhythm and speed.
A horse that is behind the leg is slow and unresponsive, and its counter tends to be more up and down rather than forward; this makes adjustments difficult.
If the horse's counter is slow and weak, there is no longer a lower range to reduce speed or shorten the stride without the horse returning to a trot.
In this example, the Audi 2000 Z, a gelding warmblood belonging to Michael Britt-Leon, is a bit slow and behind the leg.
Its head is positioned too low, and from the amount of sand it scatters into the air, you can see that it drags its legs on the ground.
You should be able to apply leg pressure with varying degrees while simultaneously softening your hands to ask your horse to move forward or lengthen its stride.
I like to think of this in the order of "asking, telling, and forcing."
First, ask the horse to move forward with a gentle leg pressure.
If that is not effective, add a short sound and then apply the spur.
Some riders make the mistake of using the spur and leg simultaneously; this can create a spur effect on the horse's body and desensitize it to the aids.
The spur should only be used to reinforce the leg aid.
If the spur also does not get a response, give the horse a light tap with your crop right behind the leg.
You should also be able to release your leg and close your hand to reduce the horse's speed and shorten its stride.
If you use the leg without the hand, the horse speeds up and ultimately falls on the hand.
Conversely, too much hand and insufficient leg may cause it to lose rhythm or lose too much power.
The ultimate goal is for the horse to carry itself.
The eight exercise is simple, but all the points you focus on are the tools you need for a smooth and flawless jumping round with the horse.
In this exercise, you work on maintaining rhythm and forward momentum, staying on the line of movement, and influencing the front hand; all while trying to keep your aids subtle.
You first execute the eight pattern on the flat without jumping.
Then you can add a pole in the middle of the eight.
Start by working on a circle over the pole, and if this part is simple, you can add the complete eight pattern with a pole or obstacle in the middle.
Begin the work with a canter in the eight pattern.
By keeping the horse between your hands and legs, stay precisely on the line of movement as if you are moving in a defined corridor.
Try to ride exactly the same line each time so that the horse's hooves land in the same previous spots.
If you feel the horse is deviating from the line of movement, alternate the pressure from your right or left leg.
If it is leaning outward, use the outside leg and bring your hands slightly inward; with a slight opening of the inside rein and maintaining the outside rein.
If the horse is falling inward, push it outward with your inside leg while both hands go slightly outward and the outside rein opens slightly.
Jordan has kept the Audi 2000 Z with a good rhythm in the counter and in front of his leg while executing the eight exercise on the flat.
When this exercise goes well in the canter, try it in the counter as well, keeping the same principles in mind.
Keep the horse in front of your leg, in rhythm, and with equal counter strides.
In the middle of the eight pattern, with a simple change through the sitting canter, change the front hand.
After practicing this pattern in the counter, you can also add a ground pole to it.
You should still consider this exercise a flatwork task, just with a ground pole – or a jump – in the path.
Before moving on to the complete eight pattern, pass over a ground pole in the counter and if this is simple, then over a short vertical obstacle.
Divide the circle into three sections.
To create, maintain, and recover the canter, it may be helpful to divide the circles of the eight pattern into three sections.
1. Create or adjust the canter, 2. Maintain the canter until reaching the ground pole or obstacle, and 3. After landing, check if you have taken the correct hand and assess the quality of the canter; is it the same as before, faster, or slower?
If it has become faster or slower, recover your initial canter.
By making continuous adjustments, do not disrupt the rhythm of the canter.
If the horse is balanced and the rhythm remains steady, it can do this itself.
If you can maintain the same rhythm throughout the entire circle, then change direction and execute the complete eight pattern.
Just as you rode on the circle, maintain the same rhythm and balance throughout the entire eight pattern.
To ensure the horse lands with the correct hand when passing over the ground pole or obstacle, apply a little pressure with the rein on the same side as your desired hand and simultaneously apply a little pressure with the opposite leg.
Therefore, if you are exiting a circle to the left, to take the right hand, act with the open right rein after leaving the ground and apply pressure with the left leg.
Make sure your connection with the horse's mouth is very soft so that you do not cause the horse to lose its form in the air.
If the horse lands incorrectly with the hand, bring it back to a canter and take the correct hand again.
On the landing side, focus on keeping your heels down and landing on your feet so that you are in the correct position and ready for the next movement.
If you do not land on your feet, you may fall onto the horse's neck; in this case, the horse loses its balance and falls onto the front hand, making it more difficult for both of you to regain your positions.
If your body position is firm and confident, you can make necessary adjustments almost with imperceptible aids.
The final result is a confident and coordinated partnership that leads to smooth and effortless show jumping rounds.
Practical Horseman thanks Michael Britleone and Windsor Stables in Milton, Georgia for providing the venue and horses used in the photos for this article.
About Holly Hugo-Vidal
Holly Hugo-Vidal, a coach, judge, and instructor, operates at Braewood Farm in Milton, Georgia.
Among her guiding coaches is her former husband, Victor Hugo-Vidal, with whom she managed the successful Cedar Lodge Farm riding school in Stamford, Connecticut; also, Rodney Jenkins, a show jumping rider, has been another of her mentors.
She is also the author of the book "Build Confidence Over Jumps!"
This article was first published in the Winter 2025 print issue of Practical Horseman.
Source: Practical Horseman – Training