What tools do you need for horseback riding?
I never really wanted an office with a view; I wanted a view for my office.
That's why my window opens to the Blue Ridge Mountains, and that's also why autumn is one of my favorite seasons of the year.
By this time of year, I’m a bit tired of competitions, and at the same time, I’m planning for next year.
The leaves are changing color, and I’m also mapping out how to ensure my students take everything in.
I know it won’t happen that way, but as the song goes, “You have to have a dream,” otherwise, “How do you expect your dream to come true?”
I’ve been thinking about the horses and riders I will work with this year, and I’ve come to the conclusion that perhaps some of my riders need better tools to get the job done.
First of all, I only focused on their horses because I’m afraid some of them may not be suitable for the goals their riders have.
There will be some tough conversations ahead, but that’s part of my role.
Riders who are moving along an ambitious professional path must have the necessary tools to do the job, and this starts with the right horse.
This made me think more about the tools we use for riding; both the existing tools that can be improved and completely new tools that can be developed over the winter.
When I talk about “tools,” it may be natural for your mind to go to essential riding equipment like saddles and bridles and think that I’m going to suggest you need a different bit or saddle, or perhaps — sorry — a strap on the nose that is stronger than a simple cavesson.
No; please put the riding equipment catalog aside and hide your disappointment.
What I mean by tools is something that you acquire through time and learning: the language we use to communicate with our horses.
Of course, this language includes the whip, spur, and bit, but in its most fundamental form, it relates to your legs and hands, your sitting position, your voice, and — perhaps most importantly — your understanding of horses and their reactions to various stimuli.
Let’s start with your sitting position. In order to communicate effectively and clearly with your horse, you must maintain your body form in the saddle.
When your legs close, this movement should mean something to him.
If you gather your fingers, he should react.
But the horse must know exactly what he is supposed to react to.
Extra and aimless movements from you lead to misunderstandings for him.
If you close your heels but your hands jump back and forth like a door slamming in the middle of a storm, your horse will always listen to that tool — the same aid — that you didn’t want him to notice at all.
This is where the importance of sitting position becomes clear.
When you look at successful dressage riders, you notice that they sit in the saddle with the grace and dignity of kings and queens.
Regardless of what discipline you are involved in, you need the correct dressage position because dressage is the tool with which you teach your horse how to respond to your aids; the same aids you will use to communicate with him in any equestrian sport.
Ask someone to look at you from the side when you are in a complete stop and your stirrup length is adjusted for dressage.
Ask your coach to check that a vertical line from your ear passes through your shoulder, hip, and down to your heel.
Distribute your weight evenly on both the sit bones and the pubic bone.
Make sure there is a gentle curve in your lower back so that when the horse moves, this alignment of your skeleton causes your body to follow the movement.
This means that to stay in sync with the horse's movement, you will not need to grip or tense up.
Once you become aware of these criteria, you will gradually realize that every top-level dressage rider in the world aligns with them and sits correctly in the saddle.
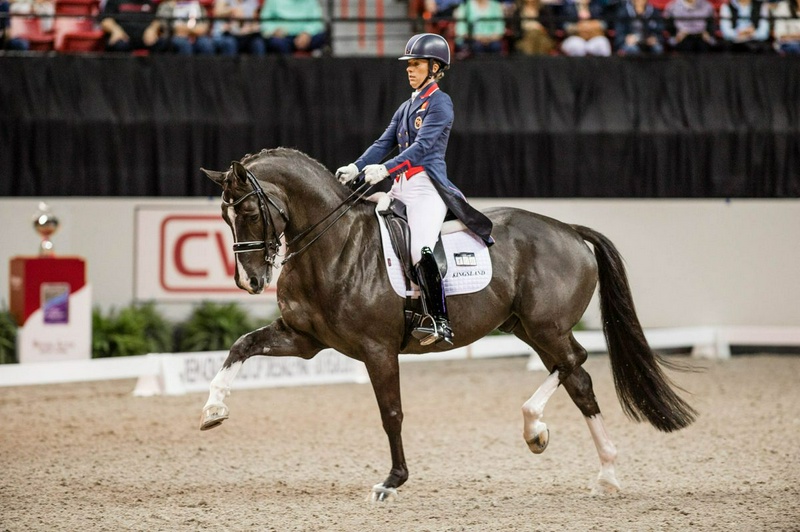
Charlotte Dujardin and Valegro are a perfect example of one of my favorite sayings: you cannot separate the way you ride from the way the horse moves.
In this photo, you can see all the basic points that the dressage coach constantly reminds you of during lessons.
"Maintain a vertical line from ear to shoulder, from shoulder to hip, and from hip to heel."
"Have a gentle curve in your lower back so you can follow the horse's movement with your back."
"Adjust the stirrup length so that the stirrup keeps your foot's toe higher than the heel."
"Look in the direction you are going."
"Make sure there is a straight line from your elbow to the horse's mouth."
"Have the same feeling on both sides of the horse's mouth."
"Always keep the horse in front of your leg."
Of course, Valegro, whom his friends call "Blueberry," was an exceptional and irreplaceable horse; but imagining what might have happened if he had been ridden by a rider who relied on the reins for balance or clung to the horse with his heels sends shivers down my spine.
Look at this photo again; this time considering the point that Charlotte's reins seem too short.
But in my opinion, her reins are perfectly adjusted, and she has opened her elbows to allow Blueberry to stretch his neck forward and down in the extended trot.
This position also resembles the correct elbow position of riders when airborne over a jump, but I will save that explanation for another time.
Additionally, Charlotte's heels are lower than her toes, and her leg is calm and still; something that tells us her horse is consistently in front of her leg.
To create forward movement, she neither has to cling to the horse with her heels nor constantly push the horse with her spurs.
Almost every world-class show jumper has a world-class leg position as well.
Elite cross-country riders jump up hills and come down the tallest drops without ever losing their balance; because their body position is so good that they can cope with sudden changes in terrain and balance.
There is no way to separate how you ride from how your horse moves.
When you are in the saddle, you have a wide range of aids at your disposal.
You must recognize each of them and only apply the one aid or aids that are necessary at that moment; and nothing extra.
A good body position along with an independent seat allows you to do just that.
It all comes down to...
I understand the training scale, but I learned dressage before this scale was invented, and my lessons were only summarized as: "calm, forward, straight."
It's simple, yes.
But it's not easy.
If your horse is not calm, it learns the wrong lessons from your aids; that is, instead of training it to progress, you are teaching it bad behavior.
From the moment you saddle your horse every day, you must work with it in a calm manner.
If we accept "calm, forward, straight" as a guiding principle and your horse is calm, the next step is the correct use of the leg aids.
Although horses' reactions to leg aids vary greatly, you must ride with very simple rules.
If you apply both legs, the horse should move forward immediately.
If you apply one leg, the horse should immediately move away from the pressure and go sideways.
The pressure you apply with your leg should be as follows: first a light and almost imperceptible pressure with the heel, then the spur, and then a tap with the whip behind the leg so that the aid, which was almost invisible a fraction of a second before the whip arrived, becomes effective.
Your horse must respond to the leg aid; that’s all there is to it.
Note that if the horse does not respond to your first aid, each subsequent aid must be stronger than the previous one and applied with a short interval.
Also, be careful that in this sequence, there is no place for continuous and repetitive heel pressure or raising the heel and using the spur to hold the horse.
You will soon realize that this practice disrupts the position of your leg.
It is obvious that each horse's sensitivity to leg aids is different, but the final result should be that you can create forward movement with an invisible aid.
Horses that are either overly sensitive to your leg or, conversely, almost indifferent to leg aids have a more challenging training; however, when you adhere to this simple sequence, working with them becomes much easier.
It goes without saying, but I will say it again: a horse that is overly sensitive has already met my prerequisite; that is, it must be in front of your leg.
To train such a horse, you must still ride with subtle leg aids and teach it to accept the connection between the inside leg and the outside rein, which I will explain shortly.
The outside rein controls the speed.
If you have a horse that willingly moves towards this forward connection, you are on the path to having a well-trained and good-riding horse.
From here on, you only need time and dressage.
Very slow horses, just like overly sensitive horses, have a difficult ride.
However, when you commit yourself to forward riding, working with them becomes easier.
The key to riding correctly with these horses is to insist on forward movement while having very soft hands.
"Engaging" the aids together — that is, simultaneously kicking and pulling — is the most common mistake I see riders make when riding slow horses.
Of course, strengthening the leg aids without the upper body, arms, and hands becoming tense is challenging and requires a truly independent seat.
Yes, it’s the same topic again.
Remember that until you have properly activated the hind limbs of the horse, you have no chance of bringing a slow and lethargic horse correctly onto the bit.
Do not resort to the "kick and pull" method for this; instead, drive him forward with a soft hand movement.
Training slow horses is challenging; not so much because they are indifferent to leg aids, but more because they are overly eager to listen to your hands and respond by slowing down.
It is better to ride slow horses with a simple snaffle bit and a relatively loose curb.
To be able to drive the horse forward with very soft hands, hold the reins in a "bicycle" position; that is, instead of having the reins under your ring finger, keep them between your thumb and index finger.
This will make you more aware of the weight of your contact with the horse's mouth.
If you do not open the door, the horse will not pass through it willingly.
I am not a big fan of modern spurs; many of them have a wheel spur or their length and shape are overly exaggerated.
My preference is a pair of Prince of Wales spurs that are properly adjusted.
If your horse does not respond to a sharp and clear pressure from these spurs — note that I said "a" sharp pressure, meaning just once — you need to do two things: first, make sure your hands are soft, and then immediately support the leg aid with the whip…
And when I say immediately, I mean exactly that.
If you repeat the same aid twice, you are no longer riding; you are fiddling and constantly nagging.
Do you have "forward, straight, and calm"?
Good, now the next step…
The movements and steps you ask from the horse must be precise, clear, and understandable.
If you ask for a leg yield before teaching the horse the turn on the forehand, you may disrupt his mental calmness.
Why are leg yields and later shoulder-in so important?
Because these are the first exercises we use to teach the horse to move forward with pressure from one leg towards the opposite hand.
In this situation, your horse is caught between acceleration and braking; you have taught him to accept your ability to control propulsion and speed.
Now you just need time…
And the right tools for each job.
My experience is that when you reach a truly independent sitting position, you can progress with any type of horse.
By using very clear aids and insisting on the correct response to those aids, you will gradually understand the reciprocal relationship between your aids and your ability to train horses.
The more you learn about horses, the calmer you become, and your riding will be more effective.
Remember…
Calm, forward, straight.
This article was first published in the Winter 2019 issue.
Source: Practical Horseman – Training