Training for a smooth and confident jump from the bank in eventing
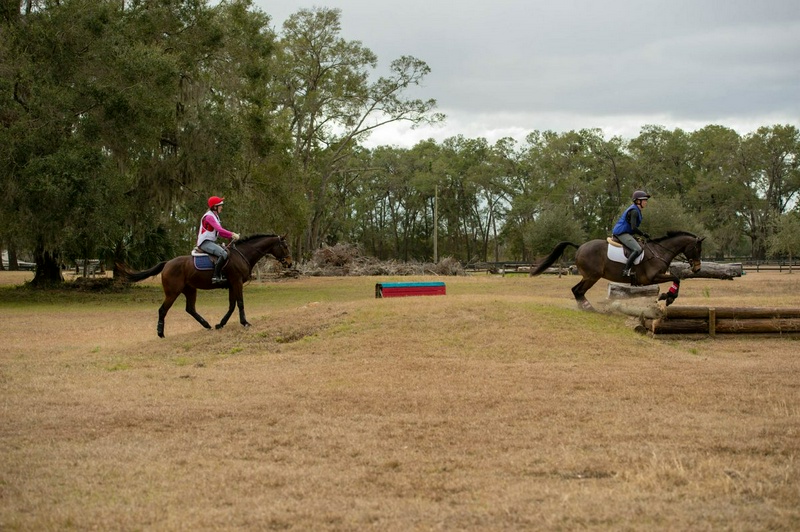
Imagine approaching a drop at the maximum height of the advanced level: 6 feet and 7 inches.
The closer you get to the edge, the obstacle appears ten times larger than when you had walked the course.
But your horse takes two short and cautious steps, then bends its knees and rabbit-like joints to bring its belly closer to the ground and then smoothly descends from the edge.
The moment its front legs leave the ground, its body rotates beneath you like a seesaw; the front part of the body rotates downwards while the back part rises.
Upon landing, a slight jolt is felt, but not so much that you can't quickly gather the reins again and guide it towards the next narrow element of this combination; an obstacle that your horse also jumps cleanly and neatly.
With a positive and systematic start, you can teach your horse to jump small banks with precision and efficiency so that later in its sporting career, it approaches larger obstacles with confidence.
Throughout this experience, you sit calmly in the saddle and keep your legs snug against the horse's sides so that your body moves with its motion, but apart from this, you do not make any exaggerated movements.
Your hip angle, along with that seesaw motion beneath your body, opens and closes, ultimately keeping you exactly in the same position you started with; so that your helmet remains aligned with your hips.
Imagine the Lipizzaner riders in the Spanish Riding School, how calmly they sit in the saddle while their horses perform movements above the ground.
They remain in the saddle, yet at the same time, they move completely in harmony with their horses' movements.
The "up" and "down" banks should be traversed just as smoothly and effortlessly at any level.
The only difference between the efforts at lower levels and the advanced level is the amount of rotation that the horse's body creates in that seesaw position.
Essentially, horses see these obstacles merely as a type of natural terrain variation.
For this reason, introducing this concept is usually easy; especially if you start from a low height.
In this article, I will explain how.
Note that in the description I provided above of an ideal crossing of a bank, there is no sign of a dramatic and heroic jump or a heavy landing on all fours.
These are exactly the scenarios you should not want.
The more explosive your horse's jump, whether going up or down the bank, the harder it will be for you to readjust the reins, balance, pacing, and line of movement for the next element of the combination; and regarding the drop, the impact upon landing increases, raising the risk of injury.
At lower levels, the next element may be relatively simple; or there may not even be a next element at all.
But as you gradually move up to higher levels, those subsequent elements become harder and harder; narrower, with different angles, and so on.
So the more efficiently and accurately you navigate the bank element, the greater your chances of passing through the entire combination without error.
The fundamental principles of traditional "uphill" and "downhill" banks, also known as drops, are so integral to the cross-country phase in eventing that they can be seen even on novice level beginner courses.
These obstacles usually consist of steps with a nearly rectangular shape that are reinforced by vertically stacking logs or telephone poles; something that is also referred to as "the seen."
At lower levels, these obstacles are typically placed individually, but at higher levels, drops, banks, and other components are often combined together at related distances.
The maximum allowed dimensions for drops and banks at the novice beginner level are 3 feet 3 inches and 2 feet 5 inches, respectively.
What do you need whether you want to introduce your horse to a bank for the first time or restart this exercise at the beginning of the season? You should use a very small bank; a bank that is no taller than the floor of a step trailer, which is about 1.5 feet.
Ideally, this obstacle should be placed alone, with no related bank or obstacle around it to distract the horse; it is also better to have a gentle slope or incline for approaching the top of the bank or exiting it.
I also strongly recommend that the introduction to the bank be done with the help of a lead horse; a calm and experienced horse guided by a knowledgeable rider.
Warm-up: Ask, insist, and compel; one of the most valuable tools you need if the horse hesitates in front of the bank is your low "click" sound.
During the warm-up, review this assistance by following the "ask, insist, compel" pattern.
With the help of your leg, ask the horse to transition from a walk to a trot.
If the horse does not respond immediately, use firmer leg aids or apply spurs.
If you still do not achieve the desired response, create a clicking sound and then give a tap with the whip.
As soon as the horse enters the trot, encourage it with your voice.
Repeat this as many times as necessary to ensure that it understands not only the meaning of the leg aids but also the meaning of the clicking sound.
Whether to introduce the upward bank first or the downward bank depends on your personal preference.
Horses are very capable of picking up on their rider's mood; therefore, if you are more anxious or hesitant about one of these two directions, your horse is likely to sense it.
To build its confidence from the very beginning, start with the direction you are more comfortable with.
I personally prefer the upward bank, so I will explain that first.
Start by following the lead horse at a medium walk and give leg aids in sync with the rhythm of the horse's steps, alternating to remind it to move forward with intent and energy.
In a straight line, move about two horse lengths behind the lead horse; a path that brings you directly perpendicular to the base of the bank to the obstacle.
Especially at lower levels, it is very important to present the horse completely straight and aligned to the obstacle, whether for the upward bank or the downward bank.
If the horse is crooked, there is a risk that it will get caught on the bank or leave one of its legs on the edge of the bank and lose its balance.
To help maintain this alignment and straightness, have a consistent and steady contact on both reins.
Check that there is a straight line from your elbows to your hands and then to the horse's mouth, and that no loops are created in either rein.
At the same time, your hands should be directed forward; never pull back, as this will cause his neck to shorten.
Meanwhile, focus your gaze on the rider's helmet of the leading horse.
After he climbs over the bank, keep your eyes on him while also maintaining peripheral vision on the upper edge of the bank.
Continue alternating your leg aids until your horse's chest is as close to the bank as possible; about 4 feet away.
Then close both legs on either side of his body to encourage him to go up it.
Be careful not to do this too early.
If you close your legs when his nose is close to the bank, his front hands are still too far away, and he won't be able to easily go over it.
If you ask him to jump too soon, there is a risk that his weight will fall on the front hand.
Don't worry; he won't get so close to the bank that he can't safely go over it.
His natural instinct tells him when to quickly gather his legs.
Resist the temptation to lean forward.
If you get ahead of your body's movement too soon, your horse will be less inclined to jump.
If, like me, you have a habit of suddenly throwing your shoulders forward, imagine you are riding in water; water that slows down the movement of your head and shoulders.
Since this bank is small, most horses will just go over it instead of jumping.
This soft and slow movement gives you a chance to think.
When your horse goes over the bank, imagine your legs are relying on two different forces: 60% gravity and 40% grip.
Use gravity by dropping your weight into your heels and keeping them aligned under your hips and helmet.
This helps maintain your balance.
Create the grip factor by pressing your calves against either side of your horse's body so he can't slip out like a bar of soap between your legs.
This ensures that your body stays with his center of gravity.
At the same time, imagine you are holding a tray of food with both hands and lifting it towards someone standing above the bank.
This way, your hands follow the horse's mouth movement.
If you feel a bit unstable in the saddle or are worried that your horse might jump higher than expected, grab his mane.
The last thing you should do is punish his good effort by pulling on his mouth.
Keep your seat close to the saddle and your center of gravity low.
Lifting the "tray" towards the bank automatically lightens your seat a bit.
Trust your legs to maintain balance and just wait for your horse to complete this upward movement.
When this happens, let this movement naturally tighten your hip angle.
At the top of the bank, encourage your horse, turn him to walk, apply alternating leg aids again, and calmly come down the sloped and easy side of the bank.
Then prepare yourself to approach it again.
Repeat this process until he confidently goes over the small bank without any signs of hesitation.
Then do the same without a lead horse.
If your horse hesitates in front of the bank, encourage him to move forward with a supportive voice.
If that doesn't work either, give him a light tap with your whip on the back of your calf.
Remember the order of "request, warning, obligation" and keep your shoulders straight and facing the bank until the horse steps onto the bank.
Since the bank is very small, the horse can easily do this from a stop.
However, if you feel it is resisting, change the plan and instead focus on descending from the bank first, using a guide horse as explained further on.
Once this step is successfully completed, you may find that it has become braver about going up the steps as well.
1.
Good to the Core, known as Simko, is a retired thoroughbred from the racetrack and is 5 years old, still very inexperienced, having only practiced bank crossing once before.
That’s why I want Annamarie Duarte to play the role of guide horse for us with Zephyr, her more experienced horse in one-star eventing.
Using alternating pressure of the legs to establish a mid-energy step, I move two horse lengths behind Annamarie and we head straight towards the center of the bank.
2.
Even with this suitable pattern, Simko hesitates in front of the bank and tries to escape to the left.
Therefore, Annamarie turns around to play the role of guide horse for us once again.
3.
This time, the young horse gains enough courage to bravely jump to the top of the bank.
I follow its mouth movement with both hands to ensure I do not interfere with its effort in any way.
4.
With inexperienced horses, it is always good to be prepared for unexpected events.
Simko kicks out briefly out of excitement at the top of the bank, so I’m glad I’ve kept my legs snug against its sides, my weight in my heels, and my center of gravity close to the saddle.
However, I make sure not to punish it by pulling back on the reins.
5.
After jumping up the bank a few times without a guide horse and from a step, this time I approach it sitting in a trot.
It still jumps a bit more than necessary, but its confidence is clearly increasing.
6.
Notice how much it uses its head and neck to maintain balance here.
It has already learned that it can trust me to give it as much rein freedom as it needs.
When going up the short step down, approach the short step from the opposite direction to ask your horse to come down from it.
Use the guide horse again, but this time maintain a bit more distance; about two and a half to three horse lengths, so that if your horse suddenly jumps out with a long and unbalanced leap, it does not risk landing on the horse in front.
Once again, approach the obstacle with a medium, determined, and organized step, using alternating leg aids.
The closer you get to the edge, keep your upper body stretched and upright while lowering your weight towards the saddle and heels.
Turn your toes slightly outward to ensure your legs grip the horse's sides more firmly.
Keep your eyes on the helmet of the rider in front, even after they come down from the step.
As you approach the edge, glance down from both sides of your nose for a moment to identify the edge; however, do not drop your chin.
The head is the heaviest part of your body.
If you lower your chin, your weight shifts forward, and the horse may interpret this as you not wanting him to jump off the step.
About a horse's length away from the edge of the step, soften your elbows without throwing your shoulders forward or losing contact with the reins.
By slightly lowering your hands and softening the reins, you encourage the horse to lower his head and neck.
This position is better than holding the reins tightly; as this may cause him to jump off the step with his head up and then land heavily on the ground.
Our goal is for the horse to come down softly and calmly, thinking that "it's not a big deal."
When he reaches the edge, close both legs around his sides.
Again, think about keeping your seat close to the saddle.
Of course, this time, the force from your legs should be about 65% from gravity and 35% from your grip, so that you sit a little more on your heels than usual for landing.
Be mindful that your lower legs stay directly under your body; not too far back and not too far forward.
If they are too far forward, you may lose your balance upon landing, and your weight may shift back into the saddle; in this case, you would hit the horse's hindquarters and he might suddenly leap forward or kick.
If your lower leg slips back, you may lean forward upon landing, putting weight on your hands and the front of the horse, and even cause him to slip or get stuck.
To find the ideal position, imagine if the horse suddenly disappeared beneath you, you would land on your own feet.
The first time you try this descent, be ready for any reaction.
If the horse lowers his neck, let the reins slip a little through your fingers.
Make sure not to pull it back.
Use the reins only for guidance, not to restrict neck movement.
Whether going up or down the step, the horse needs to use his head and neck to maintain balance and gauge depth.
As mentioned regarding going up the step, if he hesitates, execute the same sequence of "ask, insist, compel," keep his shoulders straight and facing the step, and do not accept a negative response.
As soon as he jumps down, encourage him.
Repeat this same process with the guide horse until your horse gains enough confidence to come down the bank by himself.
This time, when approaching, choose another obstacle about four or five strides after the landing spot to focus on.
When crossing the bank in both directions goes well, try approaching it at a canter.
Use your eyes, legs, and hands exactly as you did at the walk.
After several successful repetitions of going up and down the bank, conclude that day's practice.
1.
In the next stage, we approach the downward bank with the same medium and lively pace; this time we move about 2.5 to 3 horse lengths behind the guide horse, with a little more distance.
Notice that Zafir bends his knees and hocks before jumping off the bank to bring his body closer to the ground.
Anne-Marie sits quietly in the saddle and softens her hands so the horse can use his head and neck.
2.
Simko pauses once again in front of the bank.
Instead of acting too aggressively and scaring him, I give him the opportunity to examine the issue carefully.
After that, I ask that Amari to…
3.
…
play the role of a guide for us again.
This time, I stay a bit closer to his horse than usual to boost Simko's confidence.
I wish that in this scene, Amari's lower leg was closer to the saddle.
His leg has slipped back, making it harder for him to maintain his balance during the landing.
Simko still resists to a large extent, but I give him the reins as much as he needs to analyze this question.
4.
Eventually, my insistence pays off, and he dramatically takes the plunge and jumps down.
I raise my hands to gather the reins, knowing he might "celebrate" again during the landing, but I still do not pull them back.
His courage deserves a proper pat.
5.
After a few repetitions at the walk, we pass over that jump behind Amari at a canter.
Then I take Simko alone with a canter towards the bank, making sure he is focused and completely under my aids, facing forward.
Again, at the edge of the drop, I soften the reins to allow him to lower his head and neck as much as he wants.
6.
7.
Now he is really starting to understand the concept of this work.
Notice that this time, before leaving the ground, he brings his body closer to the ground; with a much softer and more confident demeanor.
As a result, our landing is more organized and professional.
I quickly shorten the reins again, and we move on.
Notice that my lower leg is still firmly beside him, just behind the saddle, and my heel is slightly lower than my toes.
To maintain my balance before, during, and after the drop, I rely on this.
Next month, I will explain how to gradually approach slightly more challenging bank questions.
About Selena O'Hanlon Selena O'Hanlon, a Canadian eventing rider, represented her country at the 2008 Olympics, the 2010 World Equestrian Games, the 2011 Pan American Games, and the 2014 World Equestrian Games, earning a team silver medal in 2010 and 2011.
In 2014 and 2017, she achieved the best results among Canadian riders at the Kentucky Rolex Three-Day Event with the gelding Canadian Sport Horse owned by John and Judy Ramble named Foxwood High.
She and "Woody" also became champions at the Fair Hill International CCI*** in 2017, and this horse earned the title of Horse of the Year in the Advanced division of the United States Eventing Association in 2017.
Selena and her mother, Morg, who are based at Balsam Hall in Kingston, Ontario, teach eventing and dressage riders at all levels and breed and sell talented young horses.
This article was first published in the May 2018 issue of Practical Horseman.
Source: Practical Horseman – Training