Qu'est-ce que les changements de pied en l'air, comment les monter et comment les enseigner au cheval ?
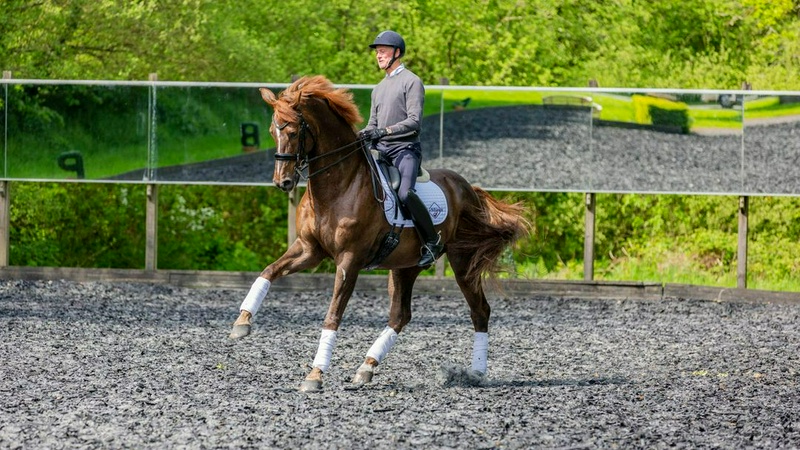
Les changements de pied en l'air sont vraiment fascinants et spectaculaires.
Je me souviens encore de la première fois que j'ai voulu en faire un ; j'avais trouvé un ami pour me filmer avec son téléphone flip pixelisé et je fixais la caméra avec un sourire idiot, tandis que mon petit poney entamait le changement de pied et le ratait immédiatement.
Pour l'instant, passons sur le fait qu'il était en retard de deux foulées par rapport au bon moment.
Cependant, il ne fait aucun doute que tant que vous n'avez pas vécu ce moment "Ah-ha!" et que tout ne s'est pas mis en place, le changement de pied en l'air peut sembler énigmatique.
Et comme chaque cheval est différent, il n'existe pas de méthode unique et infaillible pour l'enseigner.
La bonne nouvelle, c'est qu'il n'y a rien de magique dans ce mouvement.
Le changement de pied en l'air est un mouvement naturel — votre cheval le fait déjà dans le champ et en liberté — et avec une bonne base, la plupart des chevaux peuvent apprendre à le faire sur commande ; et dans ce processus, ils vous donneront également un air chic et professionnel.
Vous découvrirez ci-dessous ce qu'est exactement un changement de pied en l'air, comment le monter et par où commencer son apprentissage — sans jeter tout votre poids d'un côté comme moi.
Qu'est-ce qu'un changement de pied en l'air ?
Un changement de pied en l'air se produit lorsque le cheval, au galop, change de pied propulseur dans un mouvement fluide et continu sans passer par le trot ou le pas.
Pour clarifier, faisons un pas en arrière : au galop, le cheval mène avec une jambe avant — c'est-à-dire que cette jambe est légèrement en avant de l'autre et vous sentez que cette épaule passe davantage sous votre corps.
En tête à gauche, la jambe avant gauche est propulsive ; en tête à droite, c'est la jambe droite.
Être sur la bonne jambe est important pour maintenir l'équilibre, surtout dans les virages et les cercles, où vous voulez généralement que la jambe intérieure soit propulsive — donc sur la rêne droite et dans le sens des aiguilles d'une montre, vous serez la plupart du temps en tête à droite, et sur la rêne gauche, en tête à gauche.
Le galop a trois temps et après le troisième temps, il y a un bref moment de suspension ; une fraction de seconde où les quatre sabots sont hors du sol et votre cheval est en l'air pour un instant.
Le changement de pied en l'air se produit précisément à ce moment-là.
Le cheval change la position de ses pieds en l'air et atterrit sur la jambe opposée ; c'est-à-dire qu'au lieu que la jambe avant gauche soit propulsive, c'est maintenant la jambe droite qui l'est.
S'il est exécuté correctement, il n'y a ni glissement ni changement de rythme ; juste un passage propre d'une jambe à l'autre, comme si le cheval avait sauté d'un côté à l'autre dans les airs.
Vous voyez le changement de pied en l'air dans presque toutes les disciplines : Dressage : il apparaît à partir du niveau advanced medium et plus, est exécuté sur des lignes droites et, à des niveaux plus élevés, se fait en chaîne jusqu'à un changement à chaque foulée (tempi changes).
Saut d'obstacles : il est essentiel pour un parcours fluide et sans accroc.
Un cheval qui atterrit sur la bonne jambe — ou qui y change — peut rester équilibré dans les virages et franchir l'obstacle suivant sans perdre de temps ni perturber le rythme.
Concours complet, présentation et équitation générale : partout où le galop, les virages et le maintien de l'équilibre du cheval sont importants, un changement garde tout en ordre et confortable.
Pour un cavalier moins expérimenté, ce n'est pas seulement l'effet spectaculaire qui compte — bien que cela soit également attrayant — mais surtout le contrôle qui est important.
Un cheval qui change de pied à la demande du cavalier est un cheval que l'on peut garder équilibré et diriger dans toutes les situations ; que ce soit dans un virage lié au jump-off, sur la ligne centrale en dressage, ou simplement pour rester debout en chasse.
How to ride a flying change en supposant que votre cheval sait déjà comment changer (pour l'enseigner, consultez la section suivante), voici l'ordre des aides.
Le point principal est que le changement doit être préparé, et non exécuté soudainement — d'abord, vous mettez le cheval dans la bonne position, puis vous demandez.
1.
Établissez d'abord un bon galop.
Un galop équilibré, actif et suffisamment rassemblé pour que vous sentiez que vous pouvez à tout moment le monter en quelques foulées plus petites.
Un galop plat et étendu n'a pas de place pour un changement.
2.
Préparez-vous à l'approche du changement.
Asseyez-vous droit, rassemblez et équilibrez le galop avec un demi-arrêt, et assurez-vous que votre cheval est droit — ni en train de tomber vers l'intérieur de l'épaule, ni vers l'extérieur.
3.
Changez la position de vos jambes.
Supposons que vous êtes sur le pied gauche (avec l'antérieur gauche en tête) et que vous voulez changer pour le droit.
Votre jambe gauche, qui était jusqu'à présent à côté de la sangle, passe derrière la sangle et la jambe droite vient à la sangle.
Cette nouvelle position des jambes indique au cheval quel pied vous voulez maintenant.
4.
Changez votre poids et vos hanches.
En même temps que vous déplacez vos jambes, laissez votre assiette et vos hanches suivre — pour que votre poids se transfère subtilement vers le nouveau pied.
Ce mouvement doit être doux ; c'est juste un rééquilibrage, pas un lancer de vous-même de l'autre côté de la selle.
5.
Demandez au moment de la suspension.
Appliquez la nouvelle jambe extérieure — c'est-à-dire la jambe gauche qui est maintenant derrière la sangle — avec une aide claire mais légère, de préférence juste au moment où le cheval est prêt à bondir dans la foulée suivante.
C'est le moment où le cheval peut amener ses jambes vers l'avant et sous son corps pour le nouveau pied.
6.
Continuez à avancer.
Après le changement, continuez sur le nouveau pied avec énergie et en avant.
L'erreur la plus courante est de demander et ensuite de se figer ou de tirer sur les rênes — nous l'avons tous fait, mais les deux empêchent le cheval de bondir proprement.
Le rythme que vous devez suivre est à peu près : « Préparez…
Maintenant, allez !
» Un changement demandé dans un mouvement plat sort généralement tard ou plat ; mais un changement d'abord bien préparé a la chance de traverser le corps du cheval et de bondir.
How to teach a flying change avant d'enseigner le changement lui-même, les bases doivent être solides — cette partie n'est pas aussi excitante, mais c'est la plus importante.
Se précipiter pour atteindre le changement avant que ces bases ne soient en place est la raison la plus courante des changements désordonnés.
Votre cheval doit pouvoir : prendre immédiatement les deux pieds au galop avec une aide claire et sur une ligne droite.
Effectuer des transitions équilibrées du pas au galop et du galop au pas, sans tomber sur les épaules.
(« Sur les épaules » signifie que le cheval porte trop de poids sur l'avant de son corps, au lieu de pousser depuis l'arrière.
Cela se ressent comme une lourdeur dans vos mains ; lorsque le cheval incline sa tête vers le bas ou s'appuie sur les rênes pour garder son équilibre.
Au lieu de cela, ce que vous voulez, c'est que le cheval reste léger à l'avant et amène ses postérieurs sous son corps ; pensez « en montée », pas « en descente ».)
Gardez le galop à faux en équilibre.
Cela apprend au cheval à rester sur le pied que vous avez demandé, plutôt que de le changer à sa guise.
Une fois cela stabilisé, voici une méthode simple et sûre pour enseigner le changement de pied : 1.
Utilisez un changement de direction.
Montez une boucle peu profonde, un huit de chiffre ou traversez la diagonale ; partout où le cheval change naturellement de flexion et de direction pour que le changement de pied ait du sens pour lui.
2.
Créez un galop propre, puis rétablissez l'équilibre.
Juste avant d'atteindre le point où vous allez changer de direction, effectuez une demi-arrêt et rassemblez le galop pour que le cheval reste équilibré et attentif.
3.
Demandez lors du passage de la ligne.
Au moment où vous changez de direction, modifiez la position de votre jambe intérieure et de votre assiette et appliquez la nouvelle aide.
Puisque le cheval change déjà de direction, changer de pied devient plus logique pour lui.
4.
Récompensez ses efforts.
Même un changement initial désordonné — ou un changement « en retard derrière » (c'est-à-dire que les antérieurs changent de pied mais les postérieurs restent un temps en arrière) — mérite d'être encouragé.
Vous construisez d'abord la compréhension ; la propreté du mouvement vient avec la pratique et la force.
5.
Au début, gardez-le peu fréquent.
Demandez une seule fois, félicitez le cheval, puis continuez.
La répétition constante des changements a tendance à rendre le cheval anxieux ou prévisible.
Quelques bonnes tentatives lors d'une session suffisent.
Si le cheval est vraiment confus, certains cavaliers utilisent une barre surélevée ou un cavaletti sur la ligne de changement pour encourager le cheval à sauter par-dessus et à changer de pied derrière — mais à mon avis, utilisez-le avec précaution au début et ne l'essayez que si la simple équitation ne fonctionne pas.
Surtout, ne vous inquiétez pas si les premiers essais sont désordonnés.
Les changements tardifs, plats ou trop enthousiastes sont tout à fait naturels au début.
Ces défauts se résolvent à mesure que l'équilibre et la confiance du cheval s'améliorent — et comme tout bon entraîneur vous le dira, c'est exactement là que réside l'intérêt.
Cet article vous a-t-il été utile ?
Peut-être que lire ces articles vous intéressera aussi…
(Crédit image : Andrew Sydenham) (Crédit image : Andrew Sydenham) (Crédit image : Andrew Sydenham) (Crédit image : Andrew Sydenham) Préparation pour un half pass parfait (Crédit image : Andrew Sydenham) Source : Horse & Hound