Alignment and balance; a way for better riding
Do you sometimes have trouble turning or guiding your horse?
Do you find it difficult to control the rhythm or straightness of your horse?
Do you feel stiffness in one rein or lack the ability to bend your horse to one side?
Would you like to establish a better connection with your horse?
Do you want to feel that you and he can understand each other?
Most likely, if you are facing any of these issues, it is not due to your lack of effort, but rather the subtle misalignments and imbalances in your body.
When you are not balanced and centered in even one part of your body, you inevitably have to over-contract muscles in another part to keep yourself on the saddle.
It doesn't matter if you tighten your shoulder, your hip joint, or your ankle — every rider compensates for this deficiency in their own way — in any case, your ability to listen to and feel your horse and understand what is happening beneath you diminishes.
Anything the horse tries to feel becomes confusing for him because you are sending conflicting messages or the way of communication is completely blocked, and no connection is formed.
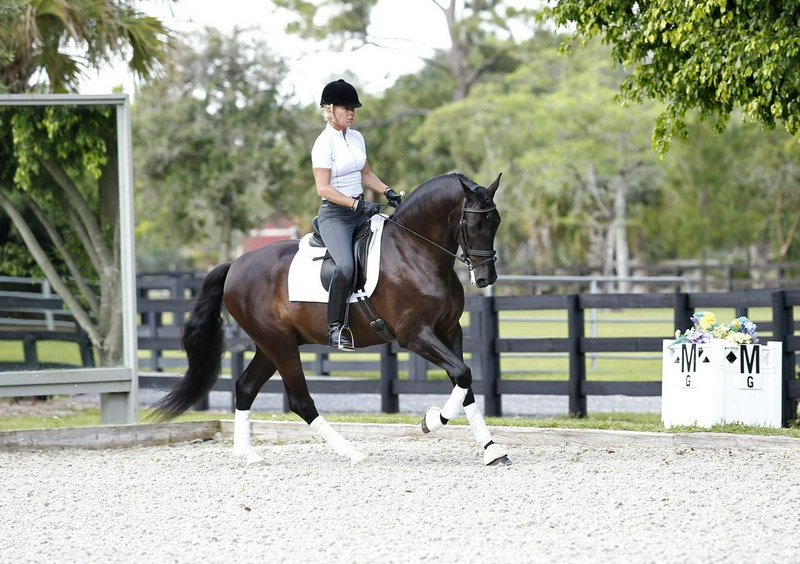
I am sitting in the correct alignment, relaxed and balanced; that is why Flowalan, my 7-year-old PRE horse, is also perfectly aligned, and we can perform the counter in complete harmony.
The correct alignment is the answer to the problem. This subject seems very simple, but as soon as your body is in the correct alignment, you can relax, achieve balance, and sit completely in harmony with your horse.
You no longer need to over-contract or tighten any part of your body to maintain your position, and your horse no longer has to shift his weight among his four legs to stay balanced beneath you.
In this case, he moves smoothly because he is correctly balanced with equal weight distribution on each leg.
In this article, I will explain how to achieve the correct alignment, balance, and relaxation.
Whether you are a relatively beginner rider or more advanced, you will immediately feel the difference.
However, this is about significant changes in soft tissue and muscle memory.
Achieving a truly independent and balanced seat may take one, two, or even three years, depending on your skill level and the time you can dedicate.
Nevertheless, even if you are not in perfect physical condition or cannot ride every day, start today and take responsibility for being as aligned and balanced as possible.
Get to work; then most of the problems you are struggling with will gradually disappear.
But before you start, I want to introduce you to this very important concept…
The Rider's Training Scale We all know the horse's training scale — rhythm, relaxation, connection, impulsion, straightness, collection — but who talks about a training scale for the rider?
I do.
And this scale begins here…
Balance and correct alignment: You no longer use any part of your body to hold yourself firmly in the saddle; therefore, your horse neither becomes stiff and blocked nor has to compensate, and as a result, he can also achieve balance and correct alignment.
Calmness: You are so free from tension that you can clearly feel your horse, and he can clearly feel you.
Understanding: You understand the goal and progress of your horse's training and gradually comprehend mentally how and why it should respond to the information you provide.
Communication: You clearly present this information to the horse so it understands what you want from it and responds willingly.
If it only reacts to incorrect information or help given in a wrong way, you never correct it for doing something wrong.
Control: Now you use all the tools and abilities at your disposal to positively influence and guide your horse's actions and behavior.
Did you notice that the last quality is controlling the horse's actions?
Unfortunately, most riders—and many trainers—seem to want to reverse this scale and focus on control, control, and more control from the very beginning.
But as long as you cannot truly control yourself, you cannot properly control your horse either.
In a straight and balanced standing position, adjust the stirrups so that when your legs are hanging freely, the stirrup foot reaches the ankle bone.
Place your foot in the stirrup and put about 90% of your body weight on the ball of your foot—not on the toe or the top of the foot—and keep the soles of your feet flat; as if you are still standing on the ground.
Of course, if you are like most riders, you have been told that your heels should be down, but if you try to force this position, your ankles will eventually become stiff and tense.
Keep the soles of your feet flat, and gradually, as your seat improves, your heels can naturally drop a little lower, as your ankles become calm, flexible, and tension-free.
With each step, your ankles naturally flex downward so you stay in sync with the horse's movement.
From behind, I want your left side to be on the left side of the horse and your right side to be on the right side of the horse.
Your spine is straight, your shoulders are level, and your head is positioned directly in the center above your shoulders without tilting or turning; a position that, if disrupted, can severely affect balance.
Look straight ahead, between the horse's ears.
As I tell my students: "At this stage, when you turn your head, your body follows, and ultimately you lose alignment and end up hanging on the horse.
Until you achieve a relatively balanced seat and learn to keep your head separate from the rest of your body, you are not allowed to turn your head."
From the side, the old rule of body alignment—ear, shoulder, hip, heel—remains the simplest and most correct way to sit.
When you lean forward or fall forward, you are positioned ahead of the horse's center of gravity.
When you lean back or fall back, not only are you behind the horse's center of gravity, but you are also behind your own center of gravity.
In both cases, to maintain yourself, you are forced to tense part of your body.
To ensure your seat is in the correct position, release the stirrups and lift your legs in front of the saddle flap.
In this position, you feel the correct placement of your sit bones, and your lower back straightens; in fact, you can no longer keep your back arched.
1.
To always feel the correct placement of your sit bones, Lori Tuckman raises her legs while standing and places them in front of the saddle flap.
His sitting bones fall straight down, and he can sit perfectly in the center of the saddle.
2.
To help Lori find the soft and flexible shoulder feel, I place my fingers on his spine and ask him to pull his elbows back and try to bring the tips of his shoulder blades to my fingers.
After that, I ask him to let his elbows go forward again, without the shoulder blades disconnecting.
With practice, you can learn to keep the shoulder blades "connected" while the elbows are at the sides of the body.
3.
To ensure the weight of the leg is evenly distributed on the chest of the foot, Lori makes sure the stirrup is completely level, sits flat on the chest of the foot, and is perpendicular to the horse's side.
The leather of the stirrup is positioned vertically, and he neither pounds down with his heel and pulls the leg muscles nor lifts the heel and contracts them.
If you try to force the heels down, you will eventually have tense and stiff ankles.
4.
To feel balance and uniformity in the saddle, Lori places his hands on the horse's neck, then stands straight in the stirrups with his upper body slightly leaning forward.
When he can take his hands off the horse's neck and remain standing without falling forward or backward, he understands that he is balanced.
He feels the stretch in the front of the leg and the release in the back of the leg.
When he allows the front leg to release and drop down and the back leg to "sink" upward, he provides the most important condition for having a pelvis that moves with the horse.
5.
To feel exactly where and how to give the rein aid, I place my fingers on the muscle that is right above the elbow and behind it and ask him to push against my steady hand with just that area.
By doing this, the shoulder, elbow, wrist, and fingers maintain their elastic and soft state.
When Lori releases that muscle without losing contact with my hand, he correctly understands the release feeling of the rein aid.
Alignment and balance in motion first read "My Four Rules for Better Progress" that follows: Stay on straight lines, stay on the second track, slow down, and set aside the thought of "round and down."
Keeping these principles in mind, stand in the stirrups and place your hands on the horse's neck.
This helps you better feel your equality and balance in the saddle.
When you can stand in a complete stand, without leaning and confidently on the stirrups, do the same exercise in motion and at the walk.
Whenever you feel your body position is falling apart or you are experiencing tension, return to a complete stand and adjust your position again.
Then work on maintaining alignment and balance in the sitting-rising trot.
The biggest problem you may face is waiting for the horse to push you up from the saddle; this will cause you to fall slightly out of the rhythm of movement and become uncoordinated, and this is a sure recipe for creating tension.
How to know?
If you feel the movement is a bit two-beat or something like "bump-bump" has occurred, return to the walk, rearrange your body position, and ask the horse for a trot again; this time try to coordinate the sitting-rising more with the horse's movement.
Meanwhile, keep your gaze and your navel directed forward through the horse's ears towards the second track, maintain your weight on the balls of your feet, keep contact with the outside rein, and close the angle of your pelvis just enough to bring you towards the center of gravity of yourself and your horse.
The canter is the hardest movement to maintain balance and alignment because it is directional; the inside part of the horse's body moves slightly ahead of the outside part.
If you are like most riders, you will compensate by turning your body slightly inward; as a result, the shoulders no longer remain parallel to the horse's withers, the inside pelvis is pushed back, the inside seat bone comes towards the center of the horse's body, and the outside seat bone separates from the saddle and is no longer aligned with the horse's outside hind leg.
In this situation, not only do you contract part of your body to hold yourself — which is usually at least the inside leg — but you also position yourself completely against the horse's movement; as a result, the horse's canter becomes uncoordinated and adjusting its stride becomes difficult.
The canter has three phases, so if you are not in sync with the first phase, which is when the horse's outside hind leg leaves the ground, you will have less coordination in the second phase — that is, the inside hind leg and the outside rein — and in the third phase, which is the inside rein, you will be completely out of rhythm.
To synchronize, turn your body slightly outward; just enough for your shoulders to become parallel with the horse's withers, your outside leg to move back, and your outside seat bone and pelvis to be positioned above the horse's outside hind leg.
Go down into the inside stirrup; otherwise, the inside pelvis bears too much weight and gets compressed.
This way, your pelvis remains soft and flexible so that it can move forward as the horse's leg comes further under its body and follow upward as the horse's back rises.
When eventually the inside part of your body is slightly ahead of the outside part of your body, you and your horse will move in sync and simultaneously.
1.
If you do not have effective contact with the outside rein, you can neither turn your horse correctly in the turn nor prevent your body from over-rotating inward.
To understand this feeling, I take the outer stirrup leather out of its holder, hold it as close to the buckle as possible, and pull it upward and forward while riding.
This keeps me stable on the outside of my horse and helps my seat remain on the inside so that I do not "float" outward and my upper body does not rotate.
I prefer this method of using the stirrup leather much more than the special strap to prevent bucking, as that strap places the hand in the wrong position and engages the wrong muscles.
Here, my hand is in the right place, and I have engaged all the correct muscles, especially the small area above the elbow and behind it; the very part that I use to give rein aids.
2.
While my fingers are closed and I have shortened the reins to maintain contact with the horse's mouth, I hold a dressage whip horizontally on the withers of Falan.
If I can keep the whip level in both dimensions, Falan almost automatically bends straight and balanced.
However, if one end of the whip goes up and the other end goes down, or one end goes back and the other end comes forward, I realize that I have allowed Falan to bend its neck too much, to fall inward, or to bulge outward.
In a normal situation, I would say I wish I hadn't looked down, but in this case, not only is it not a problem, but it is necessary to see the whip.
I explain the turns and circles in the first rule of my four rules — staying on straight lines — how centrifugal force in a circle, and also in a corner that is a quarter of a circle, can cause you to turn too much inward, your seat to shift outward, and both you and your horse to lose balance.
That is why I emphasize staying on straight lines for the initial practice of alignment and balance, not riding on circles.
However, when you and your horse are balanced and aligned at the beginning of entering a circle or corner, he handles it well; of course, provided that the movement is not too small for his level of training.
That is why our smallest circle at the training level is 20 meters.
Only when the horse gradually becomes more collected, stronger, and has a shorter stride in the training process does he gain the ability to navigate turns, corners, and circles with a smaller diameter.
Although I want you to practice balance and alignment on straight lines first, you will soon reach the end of the arena.
As you approach the corner along the second line, focus on the outside connection so that your horse stays straight and aligned and does not wobble, drift outward, or fall inward.
As you begin the turn, remember that you and your horse must always have a common focal point; therefore, look through his ears, not too far ahead of where you want to go.
Keep your shoulders parallel to his withers.
Make sure the horse's neck comes straight out from the withers.
Be especially careful not to bend his neck too much.
The correct bend means that the entire body of the horse follows a curved line.
When this bend occurs only in the head and neck, the result is that the horse falls onto his outside shoulder and drifts outward.
Similarly, be careful not to bend the horse in the opposite direction, as it will then fall inward.
When you enter the turn, continue to think about keeping yourself and your horse straight and aligned.
If you do this, the turn itself will take shape correctly.
You are ready to start circles when your horse does not drift outward or fall inward as you approach the corner or turn, and you maintain proper alignment and balance throughout.
At that stage, connect the two corners to form a semicircle, paying special attention to the second half; that is the part where you are most likely to lose alignment.
In any case, old habits die hard; therefore, it is better to stay completely aligned in a short path first and then gradually extend it.
Always think of "two" equal and connected corners — or "four" equal and connected corners — instead of thinking about "semicircle" — or when you reach it, "circle."
If you segment the exercise this way, your success will be much greater.
As you continue to work on developing your skills based on the rider's educational scale, you will see that your connection and bond with the horse will also naturally develop and strengthen over time.
1.
As you begin the turn, my focus is on keeping the outside of the Flolan's body straight and aligned.
By pulling his head and neck inward, I do not make the turn excessively sharp.
I commit myself to look directly between his ears.
I ensure that my shoulders remain completely parallel to his withers so that I never bend inward at an angle greater than his body angle.
I also think about directing my navel towards the midpoint of his ears so that I stay straight and centered on his back from my gaze to my seat.
Throughout, I make sure that his neck comes straight out of the withers and is positioned in the center of my chest.
2.
We have passed more than half of the turn, and you can see that nothing has changed; Floulan remains straight, aligned, and balanced.
My seat has not been thrown outward by the centrifugal force, and my left leg has not stuck to the horse.
Because I am positioned correctly — shoulders parallel to his withers, gaze and navel aligned with the midpoint of his ears, and a straight line from elbow to bit — his left hind leg, left front leg, and left shoulder remain aligned as they should.
When this corner, turn, or complete circle is finished, he will be completely ready to move straight or do whatever comes next.
Margin: 4 Rules for Better Progress 1.
Stay on straight lines.
No one has ever learned to keep their body properly aligned on a circle.
I know this statement seems contrary to everything you have learned up to today, but the centrifugal force in a circle — that feeling that seems to push you outward from the center — usually causes your body to rotate inward.
This rotation, no matter how slight, causes your weight and seat to shift more outward, and then to compensate, you try to contract a muscle somewhere in your body, usually in your inner leg.
The result is that you become crooked and unbalanced, and if you ride like this for too long, your horse will move just as crooked and unbalanced.
Of course, I know you will soon reach the end of the riding arena.
1.
Trotting on the second line makes me take full responsibility for controlling Floulan's front legs, shoulders, and withers from the very beginning, while allowing him to move straight from behind.
I look straight ahead, between his ears.
My legs are open and relaxed, the soles of my feet are level, and it is clear that I am centered; the center line of my shirt is exactly aligned with his tail.
2.
In the counter, again on the second line, Floulan's neck is straight from the withers to the poll, and his left hind leg and left front leg are aligned.
I am also in the correct alignment, and the soles of my feet are level on the stirrups, so that the prominent part of the sole is sitting exactly on the stirrup tread, and the stirrup is completely vertical to Floulan's side.
My elbow is by my body, there is a straight line from my elbow to the bit, and the position of the bit in Floulan's mouth indicates that my connection with his mouth is soft.
Overall, I am so balanced and aligned that if you were to take Floulan from under me, I would land straight and balanced on my feet.
It may seem that my back is overly arched and my pelvis is slightly tilted back, but at this stage of the counter, the camera has captured a moment where I am in sync with Floulan's back as it comes down.
2.
Stay on the second line.
When you ride the horse at a distance of one horse width from the wall, you inevitably have to focus on a specific destination.
This makes you pay more attention to balance and the alignment of movement, and you can better feel your horse's tendency to drift, fall, lean, or deviate, and proactively correct it.
On the second line, you become much more sensitive to the slightest oscillation and instability; something that you don't necessarily feel as clearly when you are next to the wall, on the third line, or on the quarter line.
3.
Slow down.
Until you are truly in balance and proper alignment, you cannot pursue a larger and more powerful step, unless you stiffen your body and try to hold yourself in place.
So reduce the intensity of the work and return to a shorter and slower step.
At first, both in appearance and in the feeling of riding, it may seem like you are not progressing at all.
I understand this and know that no dressage rider wants to think their horse is moving like a slow and lazy Western movement.
But this never hurts.
Its effect is only positive because it allows you and your horse to achieve balance together.
When you are learning to follow the horse's movement and become one with it, a shorter and slower step is the best teacher for reaching this goal.
But what about the competition?
Definitely participate in the competition, but prepare yourself for comments like "not forward enough" or "the horse is too slow."
Then be brave and firm enough to say, "Okay, that's fine.
If I stick to this feeling for now, there will come a time when I can ride with the same impulsion, a larger step, and the power I want that the judges are also looking for.
But I want to reach it the right way!"
Then, every now and then, try a movement with a wider step and more impulsion and ask yourself, "Am I really staying with this movement without holding myself somewhere?"
If your answer is "yes," that's great.
But if you have to say, "To be honest, I am holding myself a bit," return again to that shorter and slower step.
One day, when you are truly relaxed and settled in that calm step, you will realize that your body can also absorb a larger step and more power.
4.
Forget about rounding and lowering.
Do yourself and your horse a favor and stop trying to control his head and neck.
Let them move however they are meant to; even if they sometimes come up and go out of frame.
Just because you are doing dressage doesn't mean your horse has to be rounded and low in the neck first and foremost.
The head and neck are the last parts of the connection, and trying to pull the horse in is exactly what leads you down the wrong path and harms your ability to learn proper riding.
Work on yourself based on the rider's educational scale; then connection and control will come naturally.
About Lena Widmann
Lena Widmann does not actually consider herself a teacher.
She says, "In the end, no one can teach you how to ride.
I can stand next to the arena and give instructions from the ground, but I am really just suggesting what to do.
It is you, the rider, who must teach yourself how to execute it in practice.
That's why my dream horse only had two legs.
If riders were tired and frustrated by their horses constantly losing balance and toppling over, they would quickly reach true balance and alignment.
» Lena, based in Wellington, Florida, is a Federation-approved instructor in United States dressage up to fourth level.
She has presented this perspective both in her home lessons and in clinics in Texas, Oklahoma, Kansas, New Jersey, California, and the Caribbean country of Barbados.
She has been a coach at the Pan American Games twice and has students whom she began training 18 years ago, and they have succeeded in winning medals at the FEI World Challenge dressage competitions.
With such an unwavering focus on calmness, alignment, and unity with the horse's movement, she emphasizes that this approach allows the rider to feel comfortable.
She says, "When you are comfortable, you can ride with more power because you can absorb that power in your body.
And that’s where you enter a stage where you feel the collection and real energy from your horse's hindquarters."
Thanks to Elizabeth "Betsy" Juliano for providing the Hyon-Safe farm as the location for the photography of this article.
This article was first published in the October 2013 issue of Practical Horseman.
Source: Practical Horseman – Training