Important points for coordinating with the horse's movement in jumping
When was the last time you practiced your light seat?
It's been a long time, hasn't it?
Chances are you haven't taken such a lesson in a while because you already know how to ride in a light seat.
In fact, you do this automatically and in sync with your horse's movement.
I have a purpose for asking this seemingly obvious question; of course, there are actually several points to consider, but as usual, it takes a little time to get to the main point.
Stay with me, as you will see that the most effective body position for jumping can be just as effortless and automatic as the light seat.
Proper body mechanics of the rider lead to good results, and this correct mechanics over obstacles always starts from the flawless position of the lower leg.
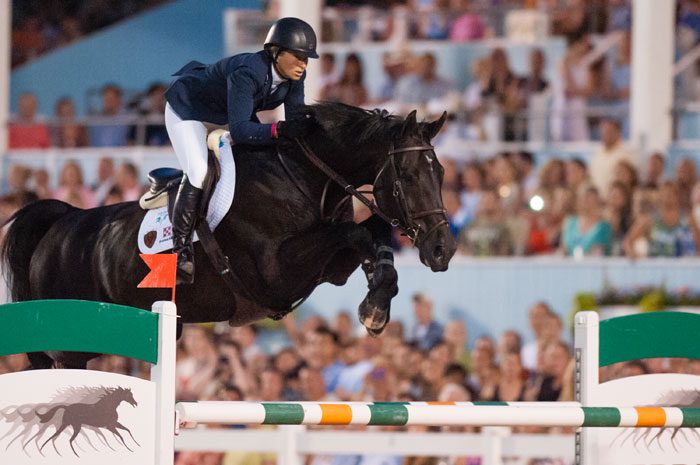
Beezie Madden, the Olympic gold medalist in show jumping, seen here on Cortes C owned by Abigail Wexner, is a prominent example of this principle.
Because Beezie's lower leg is stable and secure, her contact remains precise and delicate.
She hasn't thrown her upper body onto the horse; rather, she conveys the feeling that Cortes has lifted his withers toward her chest.
This technique has allowed her horse to deliver a spectacular jump over a very large wide obstacle.
Three-point and two-point Let's first make sure we are all using the same terminology.
I am going to talk about two positions that you need for riding in the jumping phases of eventing, namely show jumping and cross-country.
I refer to the first position, which is your position in show jumping, as the "light three-point."
The three points that are in contact with the saddle are your pubic bone and two seat bones.
Since the stirrups have now been shortened enough that when you are sitting in the saddle they create a 90-degree angle behind your knee, you need to close your hip angle a bit.
I don't have a hard and fast rule about the placement of the shoulders, as your body shape plays a significant role in your upper body position.
For example, telling someone to "keep your shoulders over your knees" would be excessive for a rider with long thighs and a short torso.
My general rule is that the tips of your shoulders should be slightly ahead of the hip joints.
The natural shape of your spine in the lower back has a gentle forward curve; a curve that can change from mild to pronounced or even flat, depending on the movement of the horse's back in walk, sitting trot, light seat, and canter.
When you sit in the light three-point position and maintain this gentle curve in your lower back with your shoulders slightly ahead of your hips, you are in the best possible position to receive the jumping movement of the horse's back and convert it into a correct two-point position at the peak of the jump arc.
I will return to this point again shortly.
The second position, the two-point, is also known as the "half-seat" or "Chaharnal" position.
You use this position in four situations: Chaharnal, jumping, any time you want to take your weight off the horse's back — for example, when going up a steep incline at the walk — and sitting trot.
I call this position "two-point" because you can maintain yourself above the horse's back using only two internal points of your knees without relying on any other support.
In the two-point position, your balance should not rely on the reins or stirrups.
Note that you should maintain this position by closing your legs from the large bone behind your knee down to your lower leg.
Do not apply pressure with the front bone of the inner part of the knee, as this will cause your lower leg to slide back.
Are you with me until the moment the light turns on?
Good.
Now let's return to the question I raised about your movement in the sitting trot; of course, this time with the terms I use.
To perform the sitting trot, you ask your horse to trot.
You sit in the saddle in one beat of the horse's two-beat movement and rise from the saddle in the next beat.
Mechanically, you go from a light three-point position to two points and then return again, but the sitting trot is not something you do.
If done correctly, it is actually something you allow the horse to do with you; because his movement behind you makes you rise from three points to two points.
Your seat should remain close to the horse's back.
It does not matter to the horse whether your seat bones are 1 inch above his back or 1 foot; but he is fully aware of whether you have moved too far forward or lagged too far back.
The closer you keep your center of gravity to the horse, the more coordination there will be between you.
Now let me ask another question: When I describe your transition from three points to two points and back again, am I talking about your movement in the sitting trot or your movement while jumping?
Exactly; these two are one single movement.
Your movement in jumping is based on the same mechanics you use for the sitting trot in the trot.
Here, I hope one of the chandelier lights in your mind has turned on.
One of the ways instructors understand that a beginner class is ready for the first cross-rail with quiet school horses is that the students can perform the sitting trot correctly, then maintain a two-point position along the long side of the arena, and then smoothly return to the sitting trot.
This position over fences has become overly common these days in the hunter ring.
It is clear that hunter riders want to show they are moving in harmony with their horses, but this method turns a strength into a flaw.
The performance of a show hunter must be a combination of softness and ease in manners and movement, along with flawless jumping technique.
However, when the rider's weight is distributed on the horse's neck, it becomes difficult for the horse to use its body correctly.
| © Amy K.
When you understand the mechanics of your position in jumping, this position should improve.
Falling off the horse while jumping is the cause of many mistakes in jumping.
Your body position in jumping should be the result of the horse's effort to jump, not the cause of it.
Over obstacles up to 3 feet and 6 inches, your position in jumping should not exceed the usual amount of rising from the saddle in the sitting trot and rising from the saddle.
If done correctly, your position at the highest point of the jump arc is a reaction to the horse's movement behind; not that you throw yourself recklessly toward the neck of your poor and patient horse.
How to assess yourself: One of the best ways to practice body position in jumping is to trot over smaller obstacles, with a height of 2 feet and 6 inches or less, and feel that during the jump, the horse's back guides you to the two-point position.
If you place a pole 9 feet in front of the jump, it will be helpful; this will allow you to have two strides of canter between the pole and the jump.
Make sure that in the space between the pole and the jump, you are in a sitting and rising canter rhythm.
If you perform the sitting and rising canter correctly, you will feel that the moment the horse lifts off the ground, it separates you from a light three-point position to a two-point position from the saddle.
To assess your body position during the jump, the simplest strategy is to ask a friend to take photos and videos of you with a smartphone so that you can get immediate feedback.
When you review these images, remember that when jumping over obstacles 3 feet and 6 inches or shorter, your body angle relative to the ground should not change.
Of course, your body position should respond to the horse's movement during the jump, but this adjustment should be in the form of opening the elbow angle, not closing the hip angle.
Although you should maintain a fixed angle of your body relative to the ground while jumping, you may not necessarily feel this movement that way.
Tell yourself that you are keeping the hip angle fixed while jumping.
(This is not exactly what happens, but the feeling it creates is just that.)
If you still lean too far forward in the air, try this method: tell yourself that a zip line is stretched over the jump and there is a hook on your helmet.
Throughout this process, keep your helmet on that same zip line.
If the habit of leaning too far forward while jumping has taken root in you so much that these exercises are ineffective, the next exercise is to jump over small obstacles without stirrups.
When your balance is supported by the strength of the two-point position instead of the stirrups and the horse's neck, you will act more cautiously with your upper body.
So far, we have discussed your position over the jump in detail.
Now we need to talk about your position before and after the jump, when you are in motion.
In horse jumping, I want you to approach the jump and then move in the same initial position we talked about, which is a light three-point position.
This increases your safety because you are in a sitting position.
Additionally, when you are in the saddle and not on top of it, you have a greater range of motion to influence: in this position, in addition to your hands and heels, you also use your back and seat bones for aids.
Finally, as you get closer to your horse, you better internalize its stride, and this improves your timing.
However, at cross-country speeds, you need to move in the correct two-point position at a canter between obstacles.
Based on the scientific findings that have recently come to our attention, the correct position for canter is the two-point position I just described.
This position is not that inefficient "cruise mode" that is being taught these days to riders who are unaware of the situation.
That sometimes we inadvertently ride in less than optimal positions is bad enough; but that a position is deliberately taught to us that certainly disrupts our balance with our horses is truly regrettable.
"Posting" in canter, which is closely related to cruise mode, is naturally completely unacceptable in my opinion.
I want you to bring the horse from a two-point position to a canter between cross-country obstacles.
About 8 to 10 strides before the jump, transition to a light three-point position and approach the jump in that position, then jump it.
This transition means sitting softly in the saddle while your shoulders are ahead of your hips; not sitting back with your shoulders behind your hips.
As previously explained, during the jump, you should allow your horse's back to guide you into the two-point position.
At some point in your progression, usually at the intermediate level and without anyone teaching this directly, you gradually began jumping more obstacles in cross-country while still remaining in the two-point position.
This is a natural reaction to increasing speed at the intermediate and higher levels and is a sign of improving your poise, confidence, and balance.
You will notice that when you slow down for combinations, drops, and similar obstacles, you instinctively return to a light three-point position.
It took a long time for you to be able to post instinctively, but now you no longer have to think about it.
Your posting movement is a natural response to your horse's movement.
The next step in your jumping training is to practice allowing the horse's movement to place you in the correct two-point position at the peak of the jump's arc.
You will see that you don’t have to "jump the obstacle" yourself; the horse does that for you.
About Jim Wofford Jim Wofford, a seasoned columnist for Practical Horseman, competed in three Olympic Games and two World Championships.
He also became a five-time national champion of the United States.
Additionally, he was a highly respected trainer.
Since 1978 and for several decades, at least one of his students was on each of the U.S. Olympic, World Championship, and Pan American teams.
He passed away on February 2, 2023.
This article was first published in the October 2013 issue of Practical Horseman.
Source: Practical Horseman – Training