Secret in eventing: everything comes down to the ability to adjust the stride
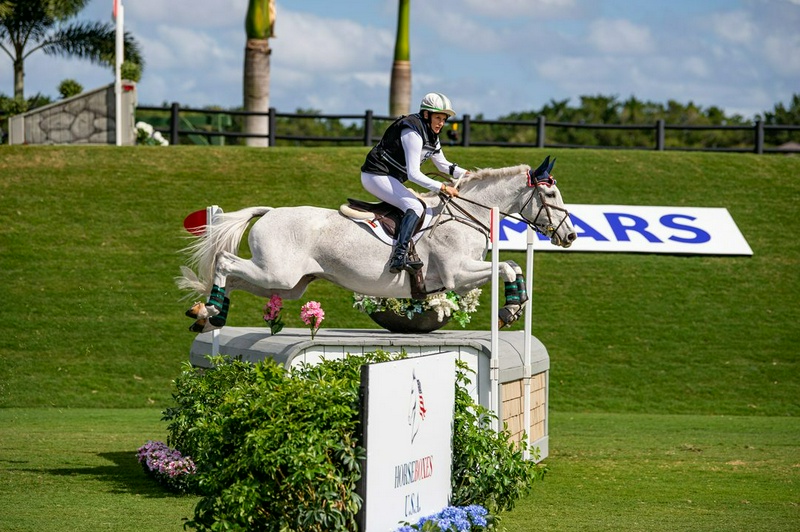
If we want to name one skill that separates a successful eventing combination from one that only jumps fences, that skill is “adjustability.”
Sara Kozumplik, a five-star eventing rider, says in her new video on Practical Horseman+ that the ability to smoothly lengthen and shorten a horse’s canter stride on demand, without losing balance, rhythm, or connection, is vital for getting through cross-country and show-jumping courses.
In cross-country, a horse must be able to gallop with a trot-like speed and cover the ground efficiently, then immediately regain balance for a turn, an angle, or a related distance that changes with the terrain.
Show jumping requires a similar skill in a smaller space; horses must collect for one compressed related distance one moment and then open back up for a longer distance the next.
Kozumplik emphasizes that if a horse only knows one kind of canter — its natural, comfortable stride — it will always be fighting the course instead of working with it.
By contrast, a horse that has learned to open and close its stride with confidence gives its rider options, and those options make it possible to get through technical questions safely and correctly.
She explains that adjustability is not just a jumping skill.
It is built through constant transitions between opening and collecting on the flat, and then refined and confirmed by testing it over fences, where the consequences of lacking adjustability become clear very quickly.
In show jumping, horses must collect for one compressed related distance one moment and then open back up for a longer distance the next.
In this image: Kozumplik and Fly Me Courageous ©Amy K.
Dragoo Kozumplik reminds riders that every horse’s natural canter is different, so it is very important to ride the horse in front of you and not rely on a single general formula.
She says: “For a horse that naturally doesn’t have a lot of ‘airtime’ in the canter, you have to create that jump in its stride.
All of our dressage is about that too.
” On the other hand, a horse with a naturally big, uphill stride may easily offer more length, but may need more encouragement to shorten.
In this lesson, Kozumplik guides a Training-level combination and a four-star combination through flatwork and over-fence exercises to help improve their horses’ adjustability.
Below, we highlight the exercises and training points she gives riders so you can incorporate them into your own training program.
(To watch the full video on Practical Horseman+, click here.
) Exercise 1: Open and close your horse’s stride on the flat Kozumplik asked riders to begin with simple transitions to lengthen and shorten the trot in flatwork.
She explains that this exercise helps the horse respond to the aids for lengthening and shortening the stride, independent of the fence, so that when you add a fence, the horse has already understood the question.
Below are her key points from these flatwork transitions: Maintain a straight line from elbow to bit.
Kozumplik says that when trying to collect a horse, many riders bring their hands down too low.
He says: “This cuts off your connection and can be very stiff and irritating on your horse’s mouth bars.
” He explains that as the horse approaches the obstacle, its body shape naturally rises a bit, so keeping the hands low can easily create resistance.
Focus on maintaining a straight line from the elbow to the bit, whether you are lengthening or shortening the stride.
Creating adjustability starts with work on the ground.
This exercise teaches your horse to respond to your aids for lengthening and collecting the stride without the presence of an obstacle.
To watch the full video on Practical Horseman+ click here!
Are you a member?
Watch the full video here.
Use your seat, not just your hands.
To open the stride, Kozumplik advises riders to go into a light half-seat so that a bigger, freer trot develops.
He says: “To close the stride, sit in your seat, keep your upper body straight and tall, and reset your horse’s trot.
” For collection, you need more leg than you think.
Many riders instinctively assume that “shortening” means pulling back.
But Kozumplik explains that collection is built from back to front; first the leg to keep the hind end active and bring it underneath the body, and then a light hand to contain the energy created.
To make collection easier, use an extended stride.
A horse that is already moving forward is much easier to rebalance than one that is behind the leg.
He says: “Use the extended trot to get your horse’s hind end moving, so when you bring it back up to collect, it becomes easier.
” Exercise 2: Straightness is Key for Adjustability Over Fences Before working on adjustability through related distances, Kozumplik asked riders to start with a warm-up 2-foot vertical to establish what he calls the non-negotiable principles of every jumping effort: you must approach the fence straight, jump straight, and land straight.
He says: “Straightness on the approach, over the fence, and away from the fence is the priority.
Everything else can be sorted out later.
” Before working on adjustability through related distances, riders warm up over a small vertical to focus on straightness before, during, and after the fence.
To watch the full video on Practical Horseman+ click here!
Are you a member?
Watch the full video here.
Throughout this exercise, Kozumplik advised riders not to obsess over which lead their horses land on.
He says: “If you focus too much on the landing lead, you’ll twist your upper body in the air and it will disrupt the horse’s jump.
” He suggested riders tidy up after the fence by halting on a straight line or, if they are confident in the horse, with a flying change, or a simple change.
What happens after the fence is just as important as what happens before it.
Kozumplik stresses that you cannot jump a line and then mentally leave it.
You must immediately ride every stride after landing so you are ready for what you need to do next.
Exercise 3: Adjustability for exact related distances At the upper levels of traditional show jumping, course designers often set distances that might be considered difficult, but Kozumplik explains that in eventing show jumping, distances are set based on a standard 12-foot canter stride.
She says: “Your responsibility as the rider is to straighten and balance your horse so it finds rideable distances and understands what kind of canter it needs for the height of the course.
Your horse’s job is also to jump over the fences.
” To help riders do this, she asked them to practice a simple line of two small fences set six 12-foot strides apart so they could get comfortable with the amount of striding.
To help riders feel how this line goes on a “normal” 12-foot stride, they first mastered it in six strides.
To watch the full video on Practical Horseman+ click here!
If you are a member, watch the full video here.
For this line, she recommends using raised cavalletti or small verticals instead of ground poles.
She points out that ground poles seem so insignificant that horses can step over them neatly and effortlessly, making it hard to tell whether you made a mistake, but a small vertical immediately after takeoff gives you honest feedback so you can understand what you may have done wrong and correct it.
She says: “If you come into this line a little flat or a little too bold and don’t hit the number of strides you were aiming for in the first few passes, that’s okay.
I don’t expect you to be McLain Ward.
” Kozumplik added jokingly: “But you do need to gradually figure out what you need to change to make the line’s exit easier for your horse.
” She offered riders the following troubleshooting tips: after you ride the line once, pay attention to how you got to the first fence.
Were you a little close?
Did the distance come up?
Were you straight and jumping in the middle of the fences?
If you were a little forward to the first fence, you may need to balance earlier in the line so you don’t run out of room at the end and end up jumping the second fence in a chip or rush.
If your canter to the first fence was a little weak or the distance was short, let your horse land and ask it to take one or two steps forward to make up the missing distance.
In the last few strides before each fence, your work should already be done so you don’t interfere with your horse’s jumping effort.
It should feel balanced and straight, because that’s when it can produce its best jump.
Exercise 4: Expanding the range of strides Collecting and lengthening strides build on each other.
Kozumplik says: “You gradually realize that the more you can collect your horse’s stride, the more you can lengthen it, and the more you can lengthen it, the better you can collect it.
” When riders could confidently ride the line in six “normal” strides, she asked them to start adding and subtracting strides so their aids would become sharper for adjustability.
For example: 1.
Ride the line in six normal 12-foot canter strides.
2.
Come back again and ride the line in seven strides by adding one stride.
You should collect and shorten your horse’s canter stride while maintaining the same quality of canter and staying soft at the base of the obstacle.
3.
On the next pass, shorten and collect more so that you add one more stride and go down the line in eight strides.
4.
On the fourth and final pass of this exercise, open up your horse’s canter again and ride the line in six strides once more.
In this exercise, Kozumplik asked riders to shorten and lengthen the strides on the line so their aids would become sharper for adjustability.
To watch the full video on Practical Horseman+ click here!
Are you a member?
Watch the full video here.
Kozumplik says that the better your horse’s adjustability becomes, the more you can expand the range in both directions.
He says: “A Grand Prix show jumper or a more advanced event horse can very easily go down this line in five strides and then collect enough to get 10 strides.
” The wider the range in which a horse can work, while maintaining balance and rhythm, the more adjustable and rideable it becomes on the competition course.
Once you have done the collection exercise for fewer strides and returned to the normal six strides, Kozumplik suggests reversing the exercise.
On the first pass, start from the collected number of strides and then lengthen it again; you can begin with eight strides, move to seven, then go six strides, and then return again to seven or eight.
Exercise 5: the “Call It in the Air” test This exercise builds on the skills you have been working on, improves your reaction time, and teaches you how to make calm, subtle adjustments.
However, Kozumplik explains that this is a more advanced test of true adjustability, so it is more suitable for riders who have already learned the fundamentals of opening and shortening their horse’s stride well.
In this exercise, he asked riders to enter the line with an average 12-foot stride.
Right as they came through the first obstacle, without any prior warning, he announced how many strides he wanted them to take on the line.
Here, the rider performs the “Call-It-In-the-Air” test and adjusts their horse’s stride length according to Kozumplik’s instructions after the first obstacle.
To watch the full video on Practical Horseman+ click here!
If you are already a member, watch the full video here.
He emphasizes: “This is a good exercise because riding does not always go as planned on the approach line.
This helps you understand how much leg and hand pressure you need to rebalance or lengthen your horse’s stride to reach the desired number of strides; so you can gradually make it more refined and softer.
” However, it should be noted that the unpredictable nature of this exercise is not suitable for every horse-and-rider combination.
Kozumplik says that inexperienced pairs or horses that are still learning the basics of stride adjustability benefit more from repeating a clear and logical stride pattern, such as six-seven-eight-six, than from being surprised by random numbers.
He says: “The goal is always to build confidence and communication, not to trick the horse or rider.
» Kozumplik says that with consistent practice, the ability to adjust pace becomes natural, and the rider can produce exactly the speed needed to get through a difficult cross-country course or a technical show jumping course.
If you are a Practical Horseman+ member, click here to watch the video.
Source: Practical Horseman – Training