Safe and reliable gallop training in horseback riding
If I think more carefully, I have spent most of my life in galloping—at least the important parts of my life have been that way.
My earliest memories are of horses, and most of these memories are tied to speed.
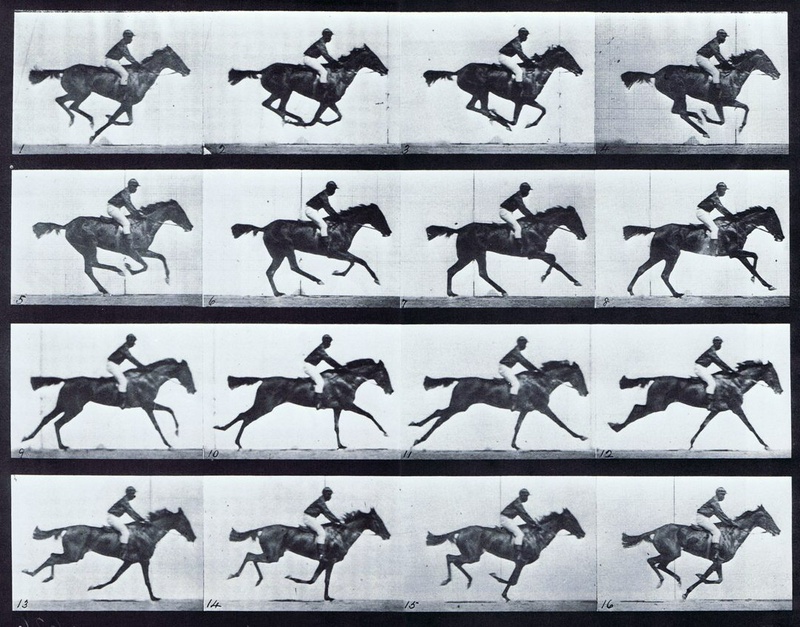
By 1878, riders were debating the mechanism of the horse’s gallop.
Some said that the horse always has at least one hoof on the ground, while others believed there was an instant when all four hooves of the horse were off the ground.
According to a probably fabricated account, the following series of photographs was taken to settle a bet by the business titan and former governor of California, Leland Stanford; he hired a photographer named Eadweard Muybridge to photograph a horse at the gallop.
The mare Sallie Gardiner, ridden by a rider named Domm (his other names have been lost over time), whom he drove at about 36 miles per hour, helped clarify this question.
Using an early version of stop-motion photography, Muybridge proved that in the gallop there is a period of flight—namely, a passage without support.
These photos were taken on the training track of Stanford’s horse-breeding farm in Palo Alto, California, where Stanford University’s campus is today.
Here, I briefly explain the mechanism of the gallop and then, step by step, show how to ride at speed safely.
In addition, I will offer notes on proper body position during the gallop and teach you how to use a pulley rein when it is necessary to collect the horse so that its gallop slows down.
The mechanism of the gallop is one more thing I like about my horse: walk, trot, and Chaharnal.
My father used to quote a U.
S.
Cavalry fitness principle: “For muscle, walk; for balance, trot; and for breath, Chaharnal.
” Each of these gaits has its own use, and there is no doubt that Chaharnal can improve a horse’s stamina, but Chaharnal and gallop are, in terms of mechanism and speed, two completely different things.
Mechanically, Chaharnal has three beats followed by a suspension phase.
When we speak of a horse in left lead in Chaharnal, we mean that the left front leg, or the “leading” leg, is the last to touch the ground.
The sequence of the left-lead Chaharnal is as follows: first the right hind leg, then the left hind leg and the right front leg land on the ground simultaneously as a diagonal pair, and finally the left front leg lands, after which a suspension phase occurs.
The scientific description of this suspended phase in Chaharnal is “unsupported transition.”
By contrast, the sequence of movement in canter-gallop is four beats followed by a suspension phase.
Riders say a horse gallops on a “lead”; the same concept used in canter: the lead is determined by the forward hoof that makes contact with the ground last, meaning that the left front leg reaches ahead of and farther than the right front leg.
The sequence of steps for a horse galloping on the left lead is as follows: right hind leg, left hind leg, right front leg, left front leg, and then a suspension phase in which all four legs are off the ground.
More than a century after Muybridge’s photographs proved the existence of a flight phase in canter-gallop, the London Royal Veterinary College continued this early scientific research with a series of studies to determine the most efficient rider position in canter-gallop.
You can find the results of these studies here.
The sequence of movement in canter is four-beat, and then a period of suspension follows.
©Amy K.
Dragoo We say that a horse is cantering on one “lead,” just as in canter: the lead is determined by the hind leg that makes contact with the ground last.
©Amy K.
Dragoo Boyd Martin, a four-time Olympic rider, showcased this series of canter photos at Windurra Farm in Cochranville, Pennsylvania.
©Amy K.
Dragoo Thanks to science, we now have a fuller understanding both of our horse’s movement in canter and of the canter position that keeps us in the closest harmony with the horse.
Depending on your horse’s specific strides and conformation, he transitions from canter to canter at around 600 meters per minute, or about 20 miles per hour.
In general, the fastest speed an equine can reach over a short distance is 44 mph.
If you’ve been reading my columns for a long time, you know better than to believe everything you read, but you can take some comfort in knowing that, no matter how fast you think you’re going, you’re actually only covering about half of the horses’ maximum possible speed.
It’s not much comfort, of course, but that’s the reality.
Galloping Safety Well, now you know what canter is; what’s next?
Because I want you to be safe and secure, we need to talk about your position before you actually start cantering.
But even before we talk about your position, we’ll look at using your head when it comes to your first canter experience.
If you’ve never experienced a fast canter, you absolutely should not borrow your friend’s 4-year-old Thoroughbred that has come off the track and ask for “a short fast canter”; because by doing so, you’re setting yourself up for a potentially dangerous experience.
There’s a good chance that if you survive being badly carried along by the horse, you’ll never again ride outside the arena.
To ensure your safety, your first fast canter experience should be on a horse that will canter when you apply leg pressure, but slow down as soon as you stop applying leg pressure.
©Amy K.
Dragoo If this is your first experience riding outside the arena, or if until now you’ve only walked on trail rides, we need to take the process of “learning to canter” slowly.
Your first fast canter experience should be on a horse that will canter when you apply leg pressure, but slow down as soon as you stop applying leg pressure.
It is also not recommended that another horse be cantering with you at the same time, because even calm horses may get excited by group fast cantering.
In that case, you may unintentionally end up in a spontaneous horse race, which is not the goal of the exercise at all.
Before I introduce you to fast canter, I first make sure that you can comfortably canter and medium canter in a large arena.
The alfalfa pasture between my barns and my house is about 35 acres in size and has always been sufficient for this.
You may be one of those riders with little or no experience outside the arena, and you need to mentally prepare before continuing the lesson.
Learn to recognize your speed Find a suitable area for a fast trot that has enough room for the wider turns you will need; because as you increase your speed over the next month, you will need them.
I am assuming that your pasture has suitable footing and is free of hazards such as stones and prairie dog burrows, because the fastest way to lame a healthy horse is to drop him into a hole or move him at a fast trot on unsuitable ground.
Measure a 400-meter "speed trap" in your fast-trot area and place markers at the beginning and end of that distance.
Make sure you can see these markers as you approach.
(I use meters instead of yards or feet because most competitions for which I prepare riders are held with metric measurements.
) I set 400 meters as the starting distance for my speed trap, because this speed is a brisk pace in show jumping and most riders will be comfortable at a medium trot at this speed.
So far, everything seems simple, right?
But wait—although 400 mpm is not much faster than the speed you are used to right now, shorten the stirrups by about 1 inch.
You should be able to stay in two-point; a position in which your seat is above the saddle but close to it, without resting your fingertips on the horse’s neck to maintain your balance.
After adjusting the stirrup leathers and with vertical stirrup leathers, test yourself in a standing position: rise out of the saddle, just as you would when posting in the trot, then pause at the highest point of that movement.
Now cross your arms in front of your body and keep your balance in that position for longer and longer periods without using your arms to hold yourself steady.
Being prepared both mentally and physically for riding at speed is very important, and riding with shorter stirrups helps improve your fitness for galloping.
©Amy K.
Dragoo doing this is harder for you than saying it is for me.
Being prepared both mentally and physically for riding at speed is very important, and shorter stirrups help you improve your physical fitness.
The reason is that shorter stirrups make your thighs and lower back tire much faster than usual.
Once the stirrups have been set shorter, continue riding back and forth at a canter in your speed trap and note the time for each exercise—400 mpm should take one minute.
You may need to teach him to accelerate in this section instead of cantering.
Remember, learning to gallop faster will be a gradual process.
When you can accurately cover the 400-meter speed trap in one minute at a canter, measure a new speed trap with markers 450 meters apart in another part of the arena.
Again, try to cover that distance in one minute.
(You can see the progression I use to develop your ability to ride at speed.
) Each time I ask you to pass through the speed trap faster, shorten the stirrup leathers by another 1 inch (approximately 1 inch shorter for every additional 100 mpm, up to 600 mpm).
The faster you gallop, the shorter you should ride, and to stay in sync with your horse’s movement, you need to close your hip angle more.
There is a good chance your horse will start anticipating speed traps, and you will have to teach him to wait before speeding up again after a speed trap.
Try to stay one step ahead of him both mentally and physically.
Using the Pulley Rein note that your horse, during this process, will become more fit, and this increase in fitness may also show up in other activities.
Horses that previously trotted calmly with a loose mane and neck over cross-country Beginner Novice tracks may suddenly wake up and show serious interest in this discipline.
This can be pleasant, but at the same time, as the horse changes, you must also change your training method.
That is why I want you to know how to use the pulley rein, because this tool is very useful when controlling your horse’s speed becomes difficult for you.
The pulley rein is a very strong tool and should only be used in emergencies.
To perform the left pulley rein, bring your right hand all the way across the horse’s neck.
At the same time, press your left hand straight down toward the horse’s left shoulder and draw it straight back toward your own left hip point.
When the horse, in response, slows down, soften the reins to reward the correct reaction.
Before you try this in the gallop, practice it in the arena and at a slow pace, and make sure you are equally skilled with both hands.
©Amy K.
Dragoo If your horse does not respond to your usual aids for slowing down, shorten the reins a little, bring your left hand all the way across the horse’s neck and in front of his withers, and press your left hand down toward his right shoulder.
At the same time, draw your right hand straight back toward your right hip.
When the horse slows down, be sure to reward him with a soft rein so he understands what you want.
single bridge or single cross is easier to set up than double bridge.
For this reason, I usually recommend this technique instead of doubling the reins.
When you use a single bridge, you hold both reins in one hand and one rein in the other hand.
Adjust the reins so that your thumbs nearly touch.
Here, the rider’s hands are shown raised for the single bridge, but when using it, place your hands firmly on the horse’s neck.
Make sure the horse is leaning on himself, not on you.
©Amy K.
Dragoo I teach people to use the double cross, also called the double bridge, when they have to control a horse in the gallop that is pulling hard against the bit.
“double” means the rider has both reins in both hands.
Adjust the reins so that the distance between your hands is reduced to a minimum.
To demonstrate this technique, this rider has raised his hands, but when you use the double bridge, place your hands firmly on the horse’s neck.
When you establish this position, the horse will very quickly realize that he is in fact pulling on himself, and most of the time he will settle down and get into a steady rhythm.
©Amy K.
Dragoo Summary I hope you very soon experience the delight that galloping brings.
I love everything about horses; from training them in dressage to teaching them to maintain calmness and balance on show jumping courses and introducing them to their first experience of going through water.
But I only feel complete freedom when my horse and I have moved away from everything and are galloping toward an invisible horizon.
Each time he floats in the air, I am freed for a moment from troubles; from critical trainers and unhappy people, from a flat tire and expensive truck repairs, from the laws of gravity and speed, and from earthly limitations.
For more reading: To read Jim Wofford's article about the science of galloping, click here.
You can find his column about how speed in cross country magnifies mistakes here.
Read all the articles by the late and great Jim Wofford in Practical Horseman here.
About Jim Wofford The late and great Jim Wofford and his loyal companion at Fair Hill International 2019.
©Sandra Oliynyk Jim Wofford, longtime Practical Horseman columnist, competed in three Olympic Games and two World Championships.
He also became U.S. national champion five times.
In addition, he was a highly respected trainer.
From 1978 and over the decades, he had at least one student on each of the U.S. Olympic, World Championship, and Pan American teams.
He died on February 2, 2023.
You can read our article titled “Remembering Jim Wofford” here.
This article was first published in the January 2017 issue of Practical Horseman magazine.
Source: Practical Horseman – Training