Improving the situation of Chaharnal for cross-country
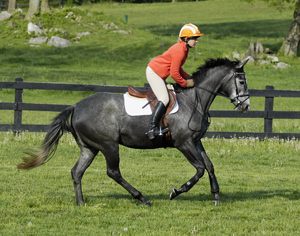
Yogi Bra says: "You can see a lot just by watching.
I wish he had stood next to me at an eventing competition some time ago and watched the cross-country riders passing by us at a gallop.
Then he would see that the riders have lost both their ability to gallop their horses in balance and their ability to maintain their own balance on the horse at a gallop.
This is troubling for me; both because it is uncomfortable for the horses and because it shows that our basic understanding of how to communicate with them has become problematic.
Before we talk about body position at a gallop, let me ask a question: in a formal cross-country course at the preliminary level, how many jumping efforts are there?
According to the rules of the United States Equestrian Federation, there are 24 to 32.
Well, now how many strides does your horse take to cover that course?
A lot, right?
We spend much more time galloping than jumping; therefore, we need to pay attention to our way of galloping.
For the purpose of this writing, I consider "gallop" anything faster than 350 meters per minute.
Everything we do with our horses should make them more comfortable.
It is obvious that horses are not as comfortable at a gallop when the rider is sitting in the saddle as they are when the rider is suspended above their back.
I usually refer to this suspended position as "two-point"; that is, the rider keeps their weight on two points of their knees, and their seat bones do not contact the saddle.
This explanation seems simple, but the next time you are at a competition, look at the riders who pass you at a gallop in cross-country.
It is not a pleasant sight.
Almost every rider who passes you is "sitting" at a gallop.
Sitting at a gallop means the rider alternately lands on the back of their horse—or falls—and then rises and falls onto the horse's hands.
When you multiply this pounding on the horse's back by the number of strides taken, it becomes clear why so many horses need special saddle pads, chiropractic care, injections in the back area, and so on.
This month, I want to focus more on your body position at a gallop rather than on how the horse itself gallops.
These two topics are actually one, but if we divide them into different sections, it becomes a bit easier to understand.
In another note, I will return to how we want our horses to gallop and how they jump out of that gallop.
First of all, let’s examine the two-point position.
There are four times we use the two-point position: galloping, jumping, the "up" phase in the sitting trot, and any other time we want to take our weight off the horse's back, like going uphill in a walk.
Before you start any of the exercises I want to explain, go to www.
Refer to the rider assessment system in the March 2008 issue and evaluate yourself based on that.
I prefer you to be at least at level 5 before trying these exercises.
If you are at a lower level but working under a knowledgeable coach, you should definitely be able to do these exercises.
These exercises are not that complicated; it’s just that I have a lot of sensitivity regarding safety, both in the stable environment and in the saddle.
I will give you two exercises to help find a better position for Chaharnal.
First, perform these exercises in an enclosed space, and then, when you are sure you are comfortable and your horse is calm, you can try them in an open area.
1: Stabilize and maintain your two-point position while mounted in an enclosed space at a complete standstill, take both feet out of the stirrups, and adjust the stirrup length so that the footbed is next to the ankle or slightly above it.
This is the correct stirrup length for jumping with a horse.
Additionally, this is the same length I recommend for cantering and jumping in novice and training cross-country levels.
As a rough rule, for every one level above level 5 in the rider assessment system, you should shorten the stirrup strap by at least one hole.
Place your foot correctly in the stirrup: that is, the ball of your foot should be on the footbed, the toe should be slightly turned outward, and your weight should be directed down onto your ankles.
If your horse is restless in the standing position, ask someone to stand quietly beside the horse's head while you perform this exercise.
Let your helper control the horse while you work on your position.
Once you have correctly adjusted the stirrup, do this simple check: stand on the stirrups without leaning forward or falling backward.
In a complete standstill, practice this several times softly, calmly, and silently, without changing the angle of your upper body.
When this becomes easy for you, place your hands behind your head in a crossed position and try again.
The key point of this exercise is to be able to adjust your body height above the horse's back softly and under control, without leaning forward onto the horse's neck or falling backward onto the tailbone.
After you have done this simple exercise several times, sit back in the saddle and relax your body.
If you are riding at level 6, you will notice that slightly shortening the stirrup strap causes the angle behind your knee to be slightly less than 90 degrees, and the hip joint angle should be about 70 degrees.
These angles may vary slightly depending on your body shape, but try to get as close to them as possible.
Still in the same enclosed space, perform this exercise while walking in the training area.
Before trying this exercise at a trot and later at a canter, make sure you are completely comfortable with it.
Keep your movements soft and proceed patiently so that your horse does not become anxious.
If there is a mirror in the training area, pay attention to the angle your upper body makes with the ground when you rise in the stirrups and then sit back down.
If you do not have a mirror, you can perform this exercise with the help of a friend and take turns taking pictures of each other's body position with a mobile phone.
Use your photos to ensure that when you rise from the saddle, you are still positioned above the vertical leather stirrup and that your knee angle is now about 110 degrees.
Note that 110 degrees is the knee angle that George Morris, my co-columnist, recommends for jumping.
The two-point position and the upper part of the jumping position are essentially the same: a balanced two-point stance.
This hip angle becomes tighter when you ride with shorter stirrups, but your poise and balance should have been established from the very beginning.
If this stage is going well for you, take the practice outdoors; go to a large, open field and repeat the same routine.
First, try it on a relatively flat ground and then gradually introduce paths with more ups and downs into the practice.
Execute the same sequence of walk, trot, and canter that you used in the enclosed arena here as well.
The more comfortable you become with this exercise, the longer you should increase the time you remain suspended above your horse's back.
Gently make contact with your seat bones on the horse's back and then return to the two-point position.
By now, you must have realized that this exercise challenges your strength and physical fitness to some extent, and that is a positive point.
II: Establishing a Calm Connection with the Horse If you have diligently worked on leveling your two-point position, my next exercise will be completely understandable for you.
First, open your thumb and little finger as if you want to measure something.
Depending on the size of your hand, this gives you a distance of about 6 inches or more.
In a complete standing position, take the reins in one hand and rise to the two-point position.
Place your other hand behind you, so that your thumb is on your thigh and your little finger touches the saddle.
In this way, a "connector" forms between your seat and the saddle.
Now adjust the position of this connector so that the angle of your knee is approximately 110 degrees.
(The closer you bring your thumb to your knee, the higher your standing position will rise and the wider your thigh angle will become, and vice versa.)
Now, for a short break, gently sit back in the saddle again.
In the next step, I want you to walk in the arena while holding the reins in one hand, go to the two-point position, create the connector with your other hand, and place it under your foot.
Good, stay right there.
No, don’t just drop down suddenly; you might hurt a finger!
While moving, maintain that exact distance between your seat and your horse's back; first at the walk, then at the trot, and finally at the canter.
At first, you will struggle with this exercise because you may have never realized how much instability there has been in your connection with your horse until today.
The secret to having a good position in canter is to absorb the horse's movement with your ankle and especially with your knees, not by opening and closing your hip angle; the same thing that the riders I previously explained in this column did.
Repeat this exercise until you can keep your upper body stable and remain a motionless and calm link between your thigh and the saddle.
Remember to occasionally switch the direction of your hands: naturally, holding the reins in one hand will be easier for you than the other, but you should strive to become completely ambidextrous in everything you do on the horse.
Once you become comfortable with this second exercise in the riding arena, return to the outdoors and follow the same previous process: first walk on flat ground, then trot in the two-point position, and then canter.
In the trot and canter, imagine the same feeling you have on a trampoline: as if the trampoline is pushing your knees up while your upper body remains balanced and still.
Gradually start holding the reins with both hands and try to maintain your position for a longer period.
Occasionally check with the aid of the interface that your two-point position remains steady and that your seat bones maintain a consistent distance from the horse's back.
You don't have a large mirror available in an open field, but you can still assess your Chaharnal position by looking at your shadow.
If your shadow constantly sways back and forth, you need to practice enough to be able to stay still on the horse.
On the side, I should mention that I do not like a Chaharnal position that is too high above the horse's back.
The further you and your horse are from each other, the greater the chance of misunderstanding and lack of coordination.
For example, flat racing riders use very short stirrups, but they keep their seat bones very close to the horse's back.
You will notice that if you ride with very short stirrups, maintaining a consistent distance between your seat bones and the horse's back is very difficult unless you are in exceptional physical condition.
This explains why most high-level riders in cross-country ride with stirrups that are one or two holes longer than necessary: in fact, they do not have enough physical fitness.
If a fit rider uses a short stirrup correctly, the shortness of the stirrup does not mean that they are positioned higher than their horse.
If you think about it, when you lift your seat bones off the saddle, it doesn't matter if you are one inch or one foot above the horse's back; in this case, your weight is no longer on the horse's back, and the knees bear it.
In conclusion, remember that your elbows should follow the horse's movement in every three strides and in all three disciplines.
We always want to maintain a consistent connection with the horse's mouth, but to develop a horse that is confident and soft in the neck, we must also be flexible ourselves.
For this reason, I advise riders against standing in the stirrups and leaning on their toes while going Chaharnal.
This position limits your joint flexibility, and this immediately negatively affects the horse's movement.
Once you master these simple exercises, your sense of stability and balance will greatly increase, and your horse will appreciate it as well.
Sources and appendices: rider rating system in the March 2008 issue Source: Practical Horseman – Training