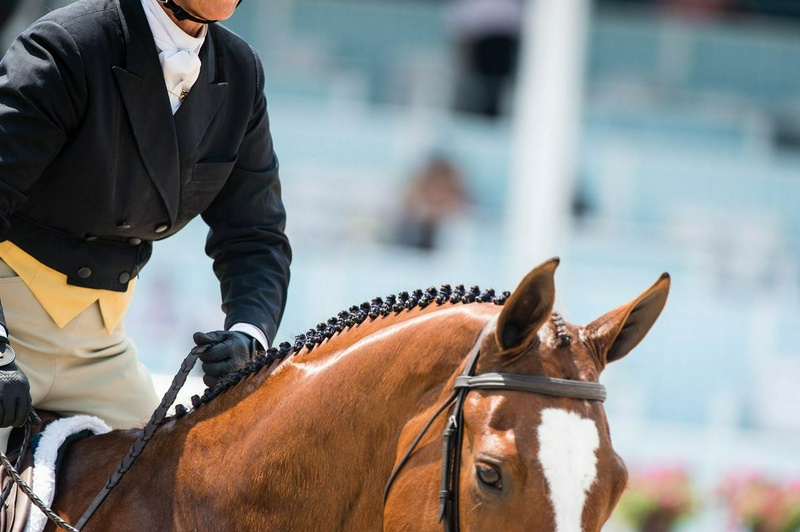
A bad braid — loose, messy, and disorganized — is distracting and creates the impression that you don't care about your horse's presentation.
Braiding is mostly about saving movement and finding rhythm.
To achieve a good braid, practice is necessary; however, it shouldn't take so long that you end up exhausted and frustrated.
The key is to have a logical and effective method that doesn't wear you out.
Eventually, your muscle memory will kick in, and braiding will become instinctive for you.
In this article, I will explain not only how to create beautiful and suitable braids for the mane and forelock for the hunter ring but also how to do it in an organized and efficient way.
Materials needed Yarn: It's important to use 100% acrylic yarn because it doesn't tear.
Thicker natural fibers like wool unravel and break more easily, so avoid them.
I usually use Treetex acrylic yarn.
I get it from Kelli Ward, a former weaver, from the All Dressed Up collection.
You can email her at alldressedupstyle@gmail.com.
Don't be afraid to use color, but keep in mind that color draws attention to the mane and may highlight flaws.
If you're not yet confident in your braiding quality, choose a color as close as possible to your horse's mane color.
Comb: It doesn't need to be a special or expensive tool.
A 7-inch plastic comb costing $2 to $3 without sharp teeth is perfectly suitable.
I like to buy my combs from Sally's Beauty Supply because they usually don't break easily.
It's better to get a comb with a colored handle so that if it falls in the stable, you can find it more easily.
Clipper blade: A large, old clipper blade is very useful for leveling or shortening the mane without thinning it.
Scissors: Sharp-bladed scissors are essential for precise yarn cutting.
I attach it to a long piece of yarn or a number string and hang it around my neck.
Shoelace: I tie a shoelace around the middle of the cut yarns and then attach it to my belt or belt loop so that I can easily grab yarn whenever I need it while braiding.
Step ladder: You can find cheap and portable step ladders at stores like Home Depot.
I like to use a ladder with steps at different heights so that I have a stable line of sight while braiding.
I don't want to bend over the horse's neck.
I prefer to be able to look slightly higher and see the braids.
Sponge and/or spray bottle: Some people prefer one over the other for wetting the mane.
Use whatever works best for you and your horse.
If your horse is scared of the spray bottle sound, obviously the sponge is a better choice.
Quick Braid: Quick Braid helps with hair grip.
You can use it in a spray bottle or with a sponge.
Latch hook: This tool, found in equestrian supply stores or craft stores, pulls the lower part of the braid through the upper part (see photo 11, page 78).
It's always good to have a spare, as it easily gets lost and breaks quite often.
I also recommend wrapping the handle with bright-colored duct tape so that if it falls from your hand, you can find it more easily.
Weaving needle: This tool is very useful for pulling up thick forelocks, but if the forelock is very thin and small, a latch hook might also work.
You can order the weaving needles and latch hooks I use from Kalei.
I hang them around my neck with a cord.
Seam ripper: Used for undoing braids and cutting thread without cutting hair.
Thumb protector: I buy 6mm mechanical rubber gloves and cut off the fingers.
I discard the palm section of the glove and use the finger sections to cover my thumbs to prevent abscesses under the nails.
These protectors also protect you if your hand is cut or your nail is broken, and they stay in place better than a bandage.
Headlamp: Useful even in daylight and makes a big difference in seeing exactly what you're doing.
Just be careful not to turn it on suddenly when you're standing above your horse's neck while braiding, so the horse doesn't get scared.
Radio: I listen to music while braiding because it's relaxing and I think it helps with patience and the whole braiding process.
I also create playlists to gently manage my work time without the pressure of a timer or alarm.
Jameez hood (stretch hood for protecting and covering the neck and braids): Once you've finished braiding, you need to protect them by covering them.
I only use the Jameez brand, but they are usually too long and come close to the horse's nostrils.
I fold it once or twice so it sits just below the horse's cheekbone (see the last photo in the "Braiding Forelock" photo gallery below).
Preparation for braiding Before you start braiding, measure and cut your threads.
Approximately, each piece of thread should be 18 to 22 inches long.
The number of threads you need depends on the thickness of your horse's mane.
The thicker the mane, the more threads you'll need.
I usually cut a skein of thread at once and keep the pieces I don't use for the next time.
Whether you decide to cut all the threads at once or not, you should prepare at least 50 pieces so you don't have to stop in the middle of braiding to cut more thread.
I've found that an 8 by 6-inch notebook is a good standard for measuring.
A three-ring binder or planner is also suitable.
I wrap the thread around the notebook or binder several times, then take it out to form a large loop of several strands of thread.
Then I hold one end, so that I have several strands of thread in my hand, and cut the other end of the loop to have several long pieces of thread.
Then I tie a shoelace around the middle of the cut threads and attach it to my belt or belt loop.
A good braid — neat, clean, and uniform — shows the judge that you know what you're doing.
A bad braid — loose, messy, and unkempt — is distracting and gives the impression that you don't care about your presentation.
Before starting, I gather all my tools: clipper blade, comb, sponge or spray bottle, snap hook, weaving needle, scissors, thread, stool, and radio.
Make sure the horse is standing on a flat surface and keep its head up by placing it on cross ties or tying it.
If you allow it to pull its neck forward and down, the mane's skin will stretch, and when it raises its neck again, the braids will compress.
If you are tying the horse, first attach two to three pieces of string to its halter ring and clip the lead rope to those strings so it releases if pulled back sharply.
If you want to braid the mane of a fussy or restless horse, ask a friend to hold it for you or do the braiding in a place where you know the horse is comfortable.
For example, a horse that always stands with its head in the back corner of its stall might be more comfortable there for braiding.
Also, you don't have to finish all the braiding in one session.
If you're working with a restless horse, take a break and then come back to finish the job.
Before starting, make sure the horse's mane is clean.
You can use any regular shampoo, but avoid conditioner or shampoos with essential oils, as they might make the mane too slippery for braiding.
Then, by running your hand through the mane, check that its thickness is uniform in all sections.
A thin mane should be shorter than a thick mane.
If you let a thin mane grow long, it will look too narrow and lifeless.
For a thick mane, remember that sometimes the mane's roots on the neck are 3 to 4 inches wide, so this part takes up some of the length.
Braiding the mane depends on the number of braids for each horse.
A finer horse with a thin mane root — where the hair meets the skin — and fine hair should have smaller braids to match its neck and body; conversely, a large, thick mane needs larger braids.
On a large horse with a thick mane, very fine braids are not suitable; they look like raisins!
If the horse's mane is coarse and thick, each hair strand is thicker and wider; therefore, the braids should be thicker.
Using wider sections of hair makes the braid thicker.
You should try to make all the braids the same thickness, and for this, keep the size of the hair sections consistent in all braids.
I braid as much of the mane as I can.
I don't believe in shortening the bridle path because each time the horse's mane is trimmed, that section gets shorter and shorter, and as a result, the first braid falls too far back.
I continue the braid up to near the withers.
It's important to stand directly in front of the section you're working on.
When braiding, be careful not to lean to one side, as you might subconsciously make the braid crooked.
Horses are always moving.
It's important that you move with them by adjusting your stool; not only to keep the braids straight and even but also to avoid putting unnecessary and undue pressure on your body, especially your back.
Remember, braiding depends entirely on practice.
You may need to repeat it over and over until your hands get used to the work.
Here are 20 simple steps to create beautiful hunter-style braids: 1.
I use the blade of a clipper to trim the tip of the mane; just about a centimeter from the bottom, wherever necessary.
Because the teeth are serrated, the edge of the hair is not cut evenly like with scissors.
When thinning the mane, I am always very careful not to rush.
It's always better to err on the side of caution and not cut the mane too short.
You can always take more hair off, but you can't add it back.
2.
The mane should be thinner and shorter near the poll and withers and remain thicker in the middle section.
The reason is that the horse's scalp is naturally narrower at the top and bottom and wider in the middle of the neck; and you want the mane to reflect this form.
3.
I use light blue yarn so it is easier to see in photos, although I don't normally use such a color on a bay horse's mane.
I start from the horse's poll and move towards the withers.
I have started braiding this mane, but the photos taken in the middle of the neck show the braiding process better.
First, I make the mane slightly sticky with a wet sponge or Quick Braid solution so it is easier to handle, and I gradually moisten the strands of hair throughout the process.
Make sure there isn't so much water that it runs down the horse's neck.
This might cause the horse to shake its head and neck, making braiding more difficult.
4.
Since I am right-handed, I separate a section of the mane for braiding with a comb in my right hand while holding the end of the mane with my left hand.
Then I insert the comb into the extra section of the mane so it doesn't interfere with my work.
I divide this section into three equal parts; I hold the right section between the thumb of my right hand and the side of my index finger, and the left section between the thumb of my left hand and the side of my index finger.
I keep the middle section out of the way with the middle finger of my right hand.
5.
For the first twist, I pass the right section over the middle section; thus, the right section now becomes the middle section, and the previous middle section becomes the right section.
Then, I take the new right section of hair with my right hand and, for the second twist, pass the left section over the new middle section.
Now that left section is the new middle section.
While braiding, I smooth and tidy the top part of the newly braided section with my thumb.
In the first two twists, I only pass the braided sections over each other.
There should be some tension, but not so tight that it puts pressure on the hair roots.
If you haven't separated the mane sections evenly, this will become quite apparent by the first two twists.
An average braid has about 23 twists from top to bottom, but this number varies depending on the mane.
6.
About two-thirds of the way down the braid, or around the thirteenth twist, I add the yarn.
The reason I wait until the thirteenth twist is that I only want the yarn to be visible in the central upper part of the final braid; something that creates a straight line along the neck.
To add the yarn, I hold the braid with my left hand and insert the yarn from underneath the braid with my right hand.
Thus, at the start, the yarn becomes part of the right and left sections of hair.
This step is difficult for many because they don't realize that the yarn just becomes part of the hair and try to hold it separately.
There's no need for that.
It's the twisting that makes the yarn part of the braid, not holding it tightly.
This part may require a bit of practice.
Just be patient and try to find the feel of it.
7.
Around the twenty-third twist, stop braiding.
At this stage, you should be close to the end of the mane.
If there is still a lot of mane left, you should undo the braid and shorten the mane, but still never cut it.
When I reach the end, I make a loop on the right side; because I am right-handed, a left-handed person should make the loop on the left side.
I lay the right side of the thread over the braid and wrap it around the underside of the braid, creating a knot at the end of the braid.
8.
Then I tie the two pieces of thread at the bottom of the braid together; just like tying a shoelace.
I do this for all the braids.
This bottom knot will eventually be pulled inside and will be slightly visible at the top of the braid.
9.
As a personal preference, when braiding, I pass the dangling thread of finished braids under the halter or loosely tie them together so that the thread is not bothersome for the horse and stays out of my way.
This only takes a second or two longer, but it is much less troublesome for a sensitive horse.
10.
Make sure to continue braiding as close to the withers as possible.
Many people leave this section unbraided.
In my opinion, to have a complete and neat appearance, it is important that the mane is fully braided.
11.
Once you have braided the entire mane of the horse, it's time to pull up the braids.
There should be a "V" visible at the top of each braid.
First, I insert the latch hook from the top of this "V" in the direction of the neck and place the two pieces of thread at the bottom of the braid into the hook loop.
Then I pass the hook through this "V" from the top of the braid to ensure the braid remains flat.
I pass the thread and knot under the upper part of the braid, but no further.
If you feel the hook is getting caught in the braid or snagging it, you are not in the "V" and have veered off.
If you have to force it, pull the hook out and try again to slide it freely.
12.
Pay attention to the single knot at the bottom of the braid, which is visible here in the center of the "V."
13.
Before moving on to the next step, I pull the thread up along the entire length of the mane with the latch hook.
14.
When I look directly at the front of the braid, I bring the two pieces of thread to the front of the braid, start the knot, let the thread settle into a "V," and pull it so that it is positioned in the center of the braid, inside that same "V."
15.
By holding the thread that protrudes from the "V" above the braid, I pull the braid up.
Then I place both pieces of thread on either side of the braid.
16.
In the next step, I pass the two pieces of thread under the braid in a crisscross pattern and incorporate any extra puff or stray hair into the work.
17.
My fingers point to where I want my next knot to be: in the center of the braid, precisely positioned in the "V"-shaped section of the twist.
18.
At this stage, tightening the knot around the braid is fine, as it no longer pulls on the scalp.
To secure the knot, I pull the two pieces of thread in opposite directions.
At the same time, I place the thread in the "V"-shaped section of the twist with my thumb and press the bottom of the braid towards the neck.
19.
Then, I bring the two pieces of thread to the back of the braid and tie another knot, pulling the thread diagonally over the braid to tighten it.
Then, for assurance, I tie a second knot.
Again, at this stage, the work should be tight.
Don't worry; this does not pull on the horse's scalp and will not be uncomfortable for them.
20.
Now, with my scissors that have a very sharp blade, I cut the excess thread from the finished braids, and I make sure to maintain the tension of the thread while cutting.
Make the cut close to the knot, but not so close that the thread unravels.
In the end, I also tidy up any stray hairs sticking out of the mane.
These should be very few; ideally, there should be no more than 5 hairs in each braid, but if you have to trim a little more, it's still okay.
This is the only time trimming the mane is acceptable.
Braiding should be enjoyable. I firmly believe that people should enjoy braiding and do it to their own taste.
Don't be afraid to use color.
Of course, remember that using color is a bit more professional because it draws a lot of attention to the mane and may also highlight flaws more.
Navy blue thread is always one of the staples of my toolkit, even for conservative classes; likewise, stone blue thread, which is really essential for white manes.
Jenny Vigliano likes to keep creativity and fun in braiding and helps her clients add cheerful and different details for occasions and holidays; like this braid with a Valentine's Day theme.
I like to help my clients stand out by using colorful and shiny threads for different themes or occasions; even adding shiny ribbons or buttons when appropriate to create a subtle and tasteful look.
I usually prefer to place these decorations in the top third of the mane.
Braiding the Forelock Braiding the forelock is very similar to braiding the mane.
The main difference is that this time you need to do a French braid.
If your horse doesn't keep its head still, ask a friend to hold it or attach a lead rope to its halter and keep it steady by placing it between your knees.
Here are 10 steps to create a perfect braid for the forelock: 1.
First, I dampen the forelock just as I wet the mane; with a wet sponge or quick braid, and then I part the top of the forelock horizontally.
The size of each section of the forelock on either side of this part depends on the thickness of the forelock; some are as small as a postage stamp and some as large as a banana.
For a small forelock, take a small section, and for a large and thick forelock, take a larger section.
2.
Then I separate this section of the mane into three parts.
Then, just like a regular braid, I make the first twist by passing the right section over the middle section and the second twist by passing the left section over the middle section.
Then, in the third twist, I start adding free hairs from the lower part of the forelock; I take a small bunch of hair from the right side and bring it into the braid, then a small bunch from the left side and bring it into the braid as well.
3.
When all the free sections are incorporated into the braid, finish it like a regular braid and add the thread under the braid about two-thirds of the way down.
At the end of the braid, loop the right piece of thread around the underside of the braid and pull it tight.
Then, with both ends of the thread, tie a knot at the bottom just as you did for the mane.
4.
Instead of using a latch hook to pull up the forelock braid like the mane, I use a braiding needle.
If your horse has a very small forelock, a latch hook might work, but it sometimes gets stuck; whereas the braiding needle does not get stuck and stays straight.
Just like the mane, find the "V" shape at the top of the braid.
Work from the top and slide the knitting needle with the needle hole facing down into the "V" and under the knit.
No resistance should be felt; if it is, you are doing it wrong.
5.
I pass the thread through the needle hole.
6.
Then I gently pull the needle up and softly lift the knit until the needle is completely out and the yarn is no longer in the needle hole.
Two pieces of yarn will remain above the "V".
Be careful not to pull the knit too high, as it will be difficult to remove later.
Leave some out so you have something to hold onto.
7.
Next, I pass the needle horizontally from the left ear to the right ear, over the knit.
The needle hole should protrude towards the right ear.
8.
Then I take the left piece of yarn, place it in the needle hole, and pull the needle out from the same path it entered to secure the knit in place.
To maintain symmetry, this can also be done on the right side, but I usually only do the left side.
9.
Then I tie three distinct and tight knots on the top part.
I tie these three knots so I can trim the yarn close to the knit without worrying about it unraveling, and at the same time, no extra yarn remains on top.
10.
When the knitting is finished, I always use the James brand protective cap to protect the knits.
I also lift the part of the James cap that is next to the horse's mouth and nostrils to just below the cheekbone.
Unraveling the knits is just like when you braid the horse's mane, make sure the horse is standing on a flat surface and use a stool.
When you look at the horse's mane, you should only be able to see the yarn at the topmost part of the knit and in the center of the knit.
1.
Using a seam ripper, I make two cuts in the yarn.
First, I pull the knit up a bit so I can cut the side of the knit; you should not cut from the front part.
Then I open the knit to let it hang and cut the bottom knot, being careful not to cut the hair.
2.
Then completely wet the mane with a sponge so the hair doesn't become wavy and unmanageable and the yarn comes out easily.
The main thing is not to damage the hair.
3.
I remove the yarn from the mane with my fingers.
I also unravel the front forelock in the same way.
I hope these tips and step-by-step instructions help you prepare a beautiful and professional knit for your horse's next show.
About Jenny Vignale Jenny Vignale has been working as a professional mane and tail braider at the "A" circuit level for over 25 years.
She has worked for prominent trainers including Scott Stewart, Jennifer Bauersachs, Anne Kursinski, and Ralph Caristo.
Vignale has won the braider award three times at the Alltech National Horse Show in Kentucky and twice at the Brandywine Horse Show in Pennsylvania.
This article was first published in the Fall 2019 issue of Practical Horseman.
Source: Practical Horseman – Health