Improving seat and balance with lunge lessons
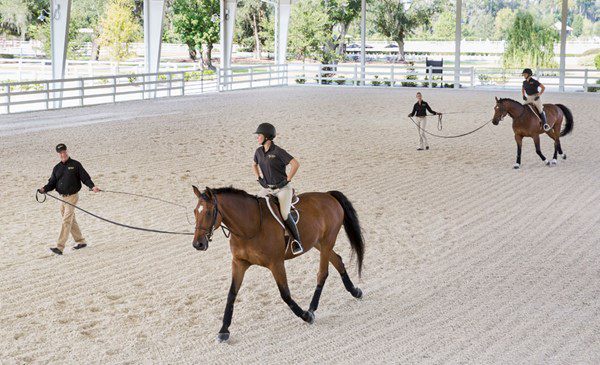
Lunge exercises for riders serve the same role as skill training for other athletes.
Just as track athletes train to perfect their body form and do not compete every day, and basketball players practice free throws instead of holding continuous practice games, riders can also practice important parts of their body separately while riding without reins on the lunge circle and work more focused on technique.
Working on the lunge can help establish and refine a stable foundation of solid principles.
At the Savannah College of Art and Design, we start all beginners with the lunge; and our intermediate and advanced riders also benefit greatly from the lunge lessons that are held almost every week.
At any level you are at, lunging can help you strengthen your body foundation, correct postural issues such as rounded shoulders or stiffness in the lower back, improve your balance, boost your confidence, and feel better in riding; for example, recognizing which diagonal hand your horse is moving on in the trot.
Lunging also helps you move with the horse's movement instead of fighting against it.
If you are competing on a collegiate team, lunge practice teaches you to quickly find your center of gravity on horses of different sizes and body shapes; a vital skill when you have little time to get acquainted with a new horse.
One unique feature of lunge lessons is that they simultaneously streamline and refine your body position while also calming your body.
When you focus on riding in the correct position, you strengthen the muscles that move your joints and increase their flexibility.
For example, strengthening the muscles around the hip and knee joints helps you lower your weight and release it away from the horse's body, resulting in a more stable riding position.
Developing the muscles around the hip joint, which is the most important joint in the rider's body position, maximizes this area's ability to absorb impact and helps you maintain your balance while jumping over obstacles in the air.
At the same time, the physical pressure from working on the lunge causes muscle fatigue and thus leads the body towards relaxation.
Relaxation is a very good antidote to body stiffness and something I call "Barbie doll riding"; that is, looking well-formed and beautiful in the saddle but not riding effectively.
There seems to be a direct correlation between stiffness in the arms and elbows and stiffness in the lower back.
When you take your hands out of the equation, you can focus on loosening your lower back.
I tell riders to imagine themselves as soldiers and to be more in a "rest" position than "alert."
When you transfer your tension to the strength and security of your body position, you allow your spine to relax and properly absorb the impact from the horse's movement.
Lunge lessons can also be beneficial for the horse and the person on the ground.
Many horses learn to take a fresh breath and relax on the lunge circle.
It seems that stability and repetition mentally balance them out.
They also become more accepting of the different things riders do on their backs.
Individuals working on the ground also learn how to use their voice, timing, and instinct to control the rhythm and type of movement, enlarging and reducing the circle, and dealing with horses with different temperaments.
Each horse has a slightly different movement and feel, and each individual working on the ground has their own specific method; for this reason, we have seen that the continuous movement of horses, riders, and individuals performing lunging is beneficial for everyone.
The person lunging has primary control over the horse; in this way, the lunge passes through the nearest ring of the bit, then goes over the horse's neck and connects to the ring on the far side.
However, reins are also available so that you can use them if necessary.
Even if you have twisted them to prevent them from dangling near the horse's legs, you can still take the reins at any time and communicate with the horse.
Since working on the lunge is physically very tiring, it is important to never overdo it.
If you continue the practice to the point of exhaustion, your sitting position and body placement will gradually fall apart, and you will reinforce incorrect habits in yourself.
Don't work on the lunge to the point where you feel dizzy and are on the verge of falling!
When I see students exhausted, holding themselves up with their knees and toes, I finish the lesson and tell them: "You are not supposed to develop your toes!"
If you are a beginner, you might only last about 10 minutes at the start.
Over time, you can increase this time to 20 or 30 minutes.
To maintain your health and that of the horse, divide the practice into sufficient walking times and keep the total session time to about 45 minutes, regardless of how advanced you are.
A little muscle soreness the next day is a natural sign of progress; however, if you are in so much pain that you cannot walk, it means you have overdone it.
Below are some important tips and safety guidelines for working on the lunge: • Always work in a safe, enclosed riding arena or space with suitable footing.
• Recommended equipment: The person working on the ground should wear gloves and have a regular lunge whip in hand.
Pass the lunge through the inner ring of the bit and over the horse's neck, then connect it to the outer ring of the bit.
Keep the reins attached to the bridle and twist them a few times before fastening the throat latch on them to prevent them from slipping near the horse's legs.
Then loop the remaining length of the reins around the horse's neck so that you can access them in emergencies.
At Sked, we do not use auxiliary reins when lunging riders because we prefer the horses to find their balance naturally.
Also, we always put protective boots on the front and hind legs of the horses.
Do not use spurs.
• Start each session with the stirrup length in the normal position; so that when your feet are out of the stirrups, the stirrup iron is slightly above the ankle.
During riding, if you feel that you are losing the angle of your hip and knee and are pushing with your lower leg, it means the stirrups are too long; or if your knee is coming up too high and lifting you off the saddle, it means the stirrups are too short; in this case, adjust them as needed.
If you change your horse, you may notice that you need a different stirrup length to accommodate the different body shape of each horse.
• If you want to ride part of your session without stirrups, after warming up, place the stirrups in front of the saddle in a crossed position so they do not touch the horse's sides and make noise; or to prevent pressure on the girth, completely detach the leather stirrups and the stirrups themselves from the saddle.
Make sure to maintain the same angles of your legs that you had while riding with stirrups.
If your knee starts to straighten, it means you are too fatigued.
At the end of the session, always put the stirrups back in place and ride a little more.
This will create good stretch in the lower leg and down to the heels and maximize all the benefits you gained from the no-stirrup exercise.
• Occasionally change direction to develop both sides of your body equally for you and your horse.
• And finally, use common sense.
Only work with a horse that is reliable on the lunge and with a person in the arena who has sufficient experience in lunging.
Do not make any sudden movements or drastic changes in your center of gravity that might surprise the horse.
Also, avoid making very small and numerous circles, as it can put pressure on the horse's joints.
The beauty of working on the lunge is that you can design a completely personalized program for yourself.
To work more precisely on your postural weaknesses, quickly review a mental checklist each time you reach the 12 o'clock point of the circle.
For example, tell yourself: “Heels down, knees bent.”
At the same time, push a little beyond your comfort zone; of course, without scaring yourself or your horse.
The more you challenge your balance by moving your hands and upper body on the saddle, the more secure your lower leg and overall sitting position will become.
Here are some interesting exercises to start: Begin working at the walk and place your hands on your hips; so that your fingers are together and resting on the bony parts at the front of your hips.
Relax your elbows and remind yourself not to put pressure on your hands and to keep yourself loose.
Keep your upper body stretched and tall while simultaneously lowering your weight towards your heels.
Feel the up and down movement of your seat bones in rhythm with the horse's steps.
When you feel calm and relaxed, try the following exercises: 1.
Start your lunge work session at the walk and feel the rhythm of the horse's steps through the swinging movement of your seat bones.
Check that your lower legs are positioned directly under your center of gravity and that the angles of your hip, knee, and ankle are all correct; just as Meryl Cooper, a student at Skid, demonstrates here.
Then, depending on your comfort level, challenge your balance and posture with various exercises.
In this image, Meryl is focusing on keeping her fingers steady without changing the position of her legs.
He helps keep his upper body elongated and centered by maintaining a direct gaze forward on the ears of Quantro.
| © Sked 1.
Practice the two-point position at the walk.
Note that when your lower legs slide back, your upper body leans forward, and when your legs come forward, your upper body leans back.
To prevent both situations, focus on keeping your lower legs directly underneath your body, regardless of what your upper body is doing.
Pull your heels down and feel the flexibility of your ankles without losing the angle of your knees.
As your confidence increases, exaggerate your two-point position and bring your chest closer to the horse's neck.
Then try to lean to each side of his neck.
The more you shift your center of gravity, the more secure your leg position becomes.
Also, instead of just listening to the instructor's explanation of where to move your body, you will become much more aware of your balance through the sense and understanding of your body.
2.
Many riders, during lunge sessions, unconsciously resist the horse's movement with their hands instead of absorbing it with their spine and soft, relaxed joints.
One of the best ways to avoid this is to place your hands on your hips and focus on keeping your elbows soft.
Find the bony protrusions at the front of your hips, then lock your fingers on them.
2.
Play with different hand positions and movements.
Open your arms to the sides like airplane wings and focus on keeping your fingers still.
Extend both hands forward.
Place both on your head.
Put them behind your back.
Gently and alternately circle with your hands.
Try to stroke your head with one hand while simultaneously rubbing your stomach with the other.
Regularly change the position of your hands to challenge your body position and balance.
This will also help improve elbow flexibility later when you take the reins again.
3.
There are countless fun exercises you can try; first at the walk and then at the trot.
For example, place both hands on your head, just as Christian Stein, a Sked student, does here.
Notice how he remains elongated and upright in his upper body while simultaneously keeping his weight on his heels.
Even though he shows a solid base, I would prefer his stirrups to be one hole longer.
This helps his legs — which are very long in proportion from hip to knee compared to the length from knee to ankle — to be positioned more downward and away from Gunter's side.
3.
Perform the rotation.
While your hands are on your hips, rotate your upper body as far left as you can and look back over your left shoulder; then rotate as far right as you can and look back over your right shoulder.
This exercise helps to secure your leg position while keeping your upper body relaxed and calm.
4.
Stroking your head with one hand and rubbing your stomach with the other is a great test of coordination.
Again, notice how Christian's position remains focused and aligned with his legs.
4.
At the walk, perform posting.
This exercise is harder than it seems.
Rise slightly from the saddle and then, just as you do in the light canter, sit back down softly and calmly; without disturbing the position of your lower leg.
For both this exercise and the two-point exercise, you can hold the horse's mane, keep your hands steady on either side of the saddle, open them to the sides, or use any other creative idea that comes to mind.
5.
First, practice the two-point at the walk and then, as your confidence increases, try it at the canter as well.
Mariel demonstrates a very good execution of the two-point here.
Her weight is well placed on her heels and her knees are firmly glued to the saddle.
To complete this picture, she has her gaze directed forward and focused on the path of the canter.
| © SCAD 5.
Find your horse's medium walk.
In every movement, the horse should be able to both extend and collect its stride and body form.
Start by finding its "ribs" at the walk.
Ask it to lengthen its stride with your leg while maintaining the same walking rhythm.
Always ensure that it responds quickly to your leg aids, and if necessary, get help from someone on the ground; if the horse is slow, use the whip and voice, and if it breaks into a canter, use a gentle correction through lunging.
Then release the pressure and allow your horse to return to its "medium" walk.
Repeat this exercise until you can create two different gears without losing rhythm.
There is no need for the above exercises to be performed in this exact order.
Do whatever works best for your skill, ability, and comfort level.
These exercises may be challenging enough that your first sessions may be entirely at the walk.
This is completely natural.
When you feel comfortable, spend part of the session without stirrups and repeat the exercises, then to finish the session, pick up the stirrups again.
When you are ready to go to the canter, start with stirrups and in a normal light canter.
As you become more comfortable, repeat the same exercises you did at the walk.
Also, work on recognizing which lead your horse is on without looking down.
This method is a great way to break the habit of always relying on looking down to control your position.
Do not rush through these steps.
To develop these skills, give yourself time over several sessions.
For intermediate and advanced riders, as your stability in the saddle improves, spend more of your lunge sessions at the trot and try different forms of the exercises described above, both with stirrups and without stirrups.
Practicing the two-point position at the trot and without stirrups is one of the most tested and effective exercises for increasing strength and balance.
Remember to stop the exercise before you become so tired that you can no longer maintain the correct body position; and always take the stirrups again afterward to ensure that the good stretch created along your lower legs to your deep heels is maintained.
Also try these exercises: 1.
At a light trot, change your diagonal every four strides.
Focus on the rhythm of your horse; if necessary, count out loud and pay attention to his reactions to even small and unintentional changes in your balance; for example, when you lean slightly forward or backward.
This will help you gain more awareness of the horse's movements beneath you and have a better rhythm when working over obstacles.
Once you master this exercise, change the diagonal every three strides and then every two strides.
Finally, repeat the same exercise without stirrups.
2.
Sitting trot.
When you feel ready to go into a sitting trot, hold the front of the saddle with one hand and direct your weight down and into the saddle; and refocus on keeping your legs closed from the hip joint to the knees.
Check that your shoulders remain aligned with your hips and heels.
Just do one or two circles this way and feel how much you can be firm and compact in the saddle, then return to a light trot or give the horse a break at the walk.
As your strength increases over several sessions, you can continue the sitting trot for longer periods.
If your side hurts, take a break!
This is just a sign that your abdominal muscles are telling you that you have overexerted yourself.
Once you are sure that your lower legs remain in the right place, gradually free yourself from holding the front of the saddle.
In the meantime, focus on using the upper parts of your legs to keep your seat in the saddle, rather than tightening your back, especially your lower back.
Then move on to a stage where you perform the sitting trot while executing the exercises and hand positions previously explained at the walk.
At the same time, remember that your back, especially your lower back, should remain in a "free and relaxed" position; neither slumped and loose, nor stiff and tight.
Keep your upper body elongated and upright, but allow your pelvis and spine to move naturally to absorb the impact and follow the horse's movement.
When this position becomes comfortable for you, try the sitting trot without stirrups.
This will force your back to be the shock absorber it needs to be and will consequently help it to relax and soften even more.
Throughout this process, keep your focus on maintaining and caring for your horse's back as much as you can.
He may have to tolerate some of your movements in the saddle; especially when you are just learning to sit the trot correctly.
But be careful not to overdo it in this work to the point where it creates the risk of painfulness in its body.
3.
If your horse is reliable and stable in the counter on the lunge and the person working with you on the ground is very experienced in lunging, include some counter practice in your sessions as well.
Just as you did in the walk and trot, hold the front of the saddle with one hand to keep your weight down and directed away from the horse's body.
This helps keep your seat in contact with the saddle while learning to move with the horse instead of resisting it.
1.
To execute the sitting trot well—without being thrown up from the saddle or landing with a thud on the horse's back—you need a strong connection from your hip to your knee.
Mariel holds the front of the saddle with one hand to sit deeper in the saddle and bring her thighs closer to it.
At the same time, she stretches down from her calf and keeps her heels deep, while her upper body remains elongated, balanced, and centered.
2.
One of the best lunge exercises for strengthening and balancing the rider's position is to be in a two-point position without stirrups.
First, do this exercise with stirrups sufficiently, then try to maintain the correct angle of your knees and ankles.
The relaxation of Christian's shoulders and facial expression while riding Gunter hides the difficulty of this exercise.
This exercise is harder than it looks!
3.
If you have a horse that is stable and reliable in the counter on the lunge, this exercise can help you connect your seat to the saddle and move more smoothly with the horse's motion.
Hold the front of the saddle with one hand to keep your weight down and directed away from its body, while allowing your hips and spine to move freely.
Christian transfers his weight to his seat and heels, while keeping his upper body elongated and relaxed, looking forward along the circle.
Eddie Fedroish has been one of the influential forces behind intercollegiate equestrian sports for decades.
He served as president of the Intercollegiate Horse Show Association from 1994 to 2001 and then worked as the executive director and chair of the hunt seat committee of the association.
For years, by taking on the role of hunt seat steward and coordinating hunt seat horses, he helped ensure the success of the association's annual national championship competitions.
Eddie received the association's lifetime achievement award this spring in recognition of his services to the sport.
Since 2013, he has been managing the equestrian program at the Savannah College of Art and Design in Savannah, Georgia.
Under his guidance and with the oversight of Ashley Henry, the head coach, SCAD Bees won the national team championship and the reserve championship in the novice team category of the United States Equestrian Federation in 2014, and also introduced Ryan Jenn, the national individual overall champion, and Lindsey Baker, the novice individual overall champion.
Source: Practical Horseman – Training